
Not long ago I was digging through the string API of a programming language and fell down a rabbit hole into Unicode. I ran little experiments, took a pile of notes, and came away understanding far more than I set out to. This article is my attempt to capture those learnings — the details of how the world’s computers share text — in case they help someone else.
I wrote it for non-programmers too. If you’ve ever wondered how the letters you’re reading right now become something a machine can store and send, that’s what Unicode answers.
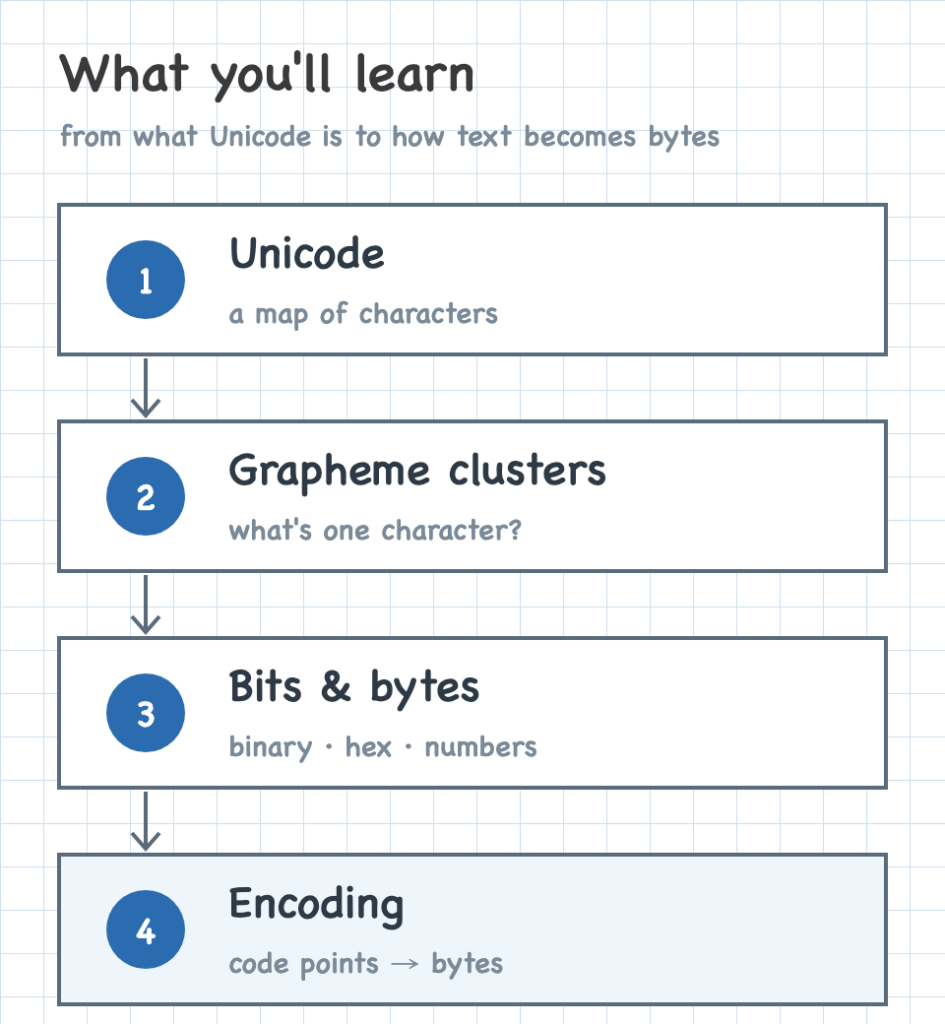
I go deep, but I build up from very basic principles: what Unicode is, what counts as a single character, and how text finally turns into bytes.
Unicode: A Map of Characters
The world has thousands of languages, each with its own characters — letters, accents, marks, and symbols. To work with text from any of them, a computer needs one universal way to catalog every character there is.
Think of a single, giant map with a numbered slot for every character, one map that everyone shares. It has room to grow: new characters take new slots as needs arise — emoji, for one, didn’t exist when the map began, and they simply claimed fresh slots.
Before such a map, every system had its own. ASCII numbered 128 characters, enough for English and little else; Latin-1 covered Western European accents, Shift-JIS covered Japanese, and many more each numbered their own languages. The same number meant different characters from one map to the next, so a file was unreadable unless you already knew which map produced it.
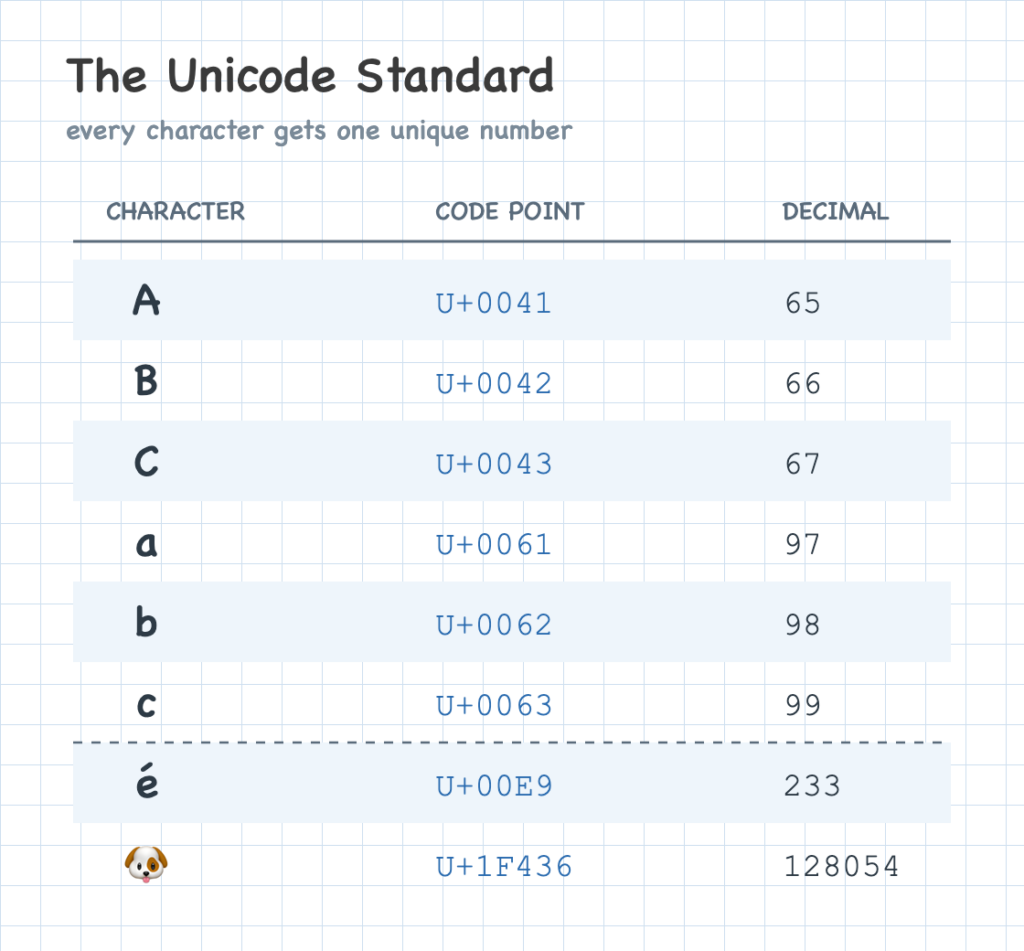
Unicode — officially “The Unicode Standard” — is that shared map. The name is a fair summary: *uni* for universal, one map for every language, and *code* because each character gets its own code, a number. That number is a code point; whenever you see “code point,” just think “the number for that character.” A code point is written with a U+ prefix and its value in hexadecimal — a compact notation we’ll get to shortly — so “A” is U+0041. Each code point names one entry in the map: a letter, a digit, a mark, or a symbol.
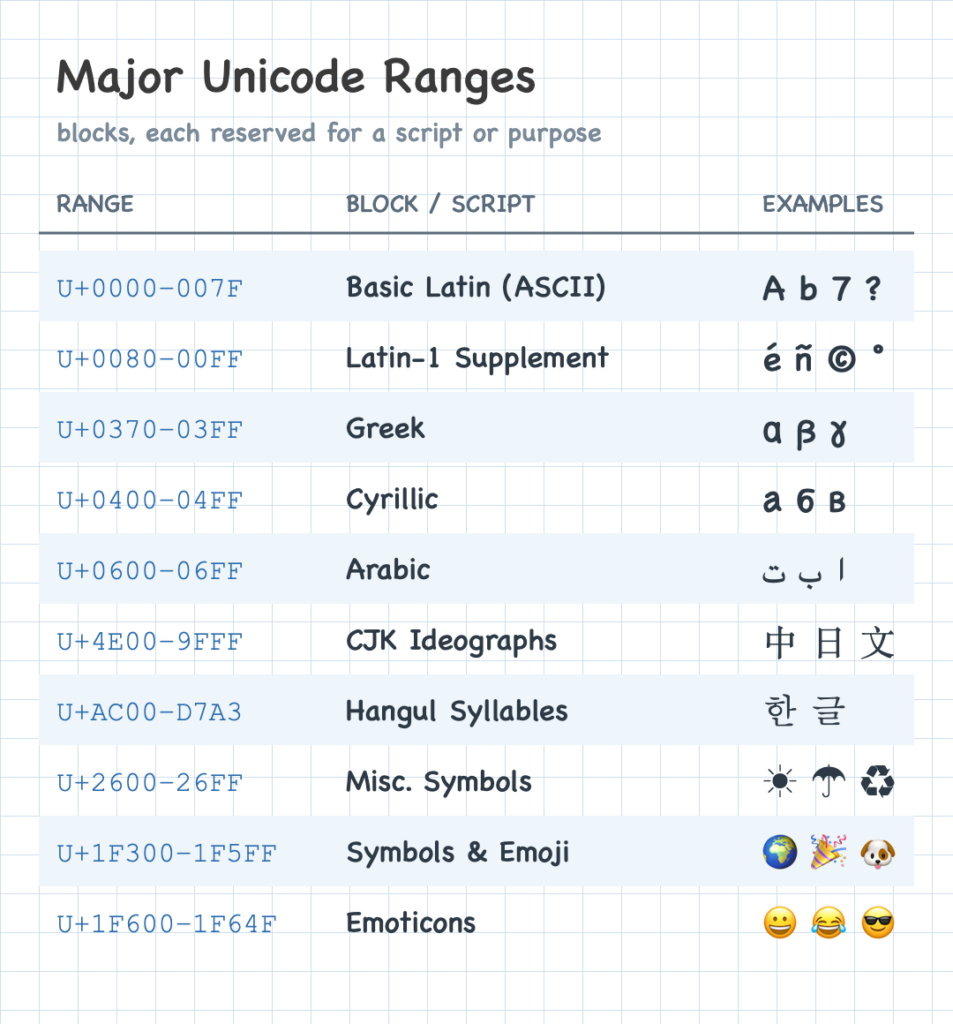
Unicode covers every writing system in use: Latin, Cyrillic, the CJK scripts for Chinese, Japanese, and Korean, along with mathematical symbols, punctuation, and emoji. One map holds all of them, replacing the old arrangement of a separate map per language.
Code points are organized into blocks, each reserved for a particular script or purpose — one for Greek, large blocks for the CJK characters, a block for emoji, and many more. The very first blocks are what let Unicode take over so smoothly.
By the time Unicode arrived, a huge amount of text and software already used ASCII. How could Unicode replace it without breaking all of that? The clever answer: it kept ASCII’s numbers. The first block is exactly ASCII — the letter A is U+0041, decimal 65, the same number ASCII gave it decades earlier — and the block right after it continues with Latin-1. So old ASCII and Latin-1 text still reads correctly as Unicode.
What Counts as a Character?
Up to now, one code point has meant one character. That’s usually true, but not always.
Sometimes a handful of code points belong together, combining into a single thing a reader sees as one character. You’d probably just call it a character; Unicode gives it a fancier name, the grapheme cluster. The name is literal — a group of code points *cluster* together to form what looks like one character.
The classic example is é. It can be a single code point (U+00E9), or two — a plain e (U+0065) followed by a combining accent (U+0301) that lands on top of it. On screen they’re indistinguishable, and either way it counts as one grapheme cluster. The grid below shows this, along with two more examples that build on the same idea.
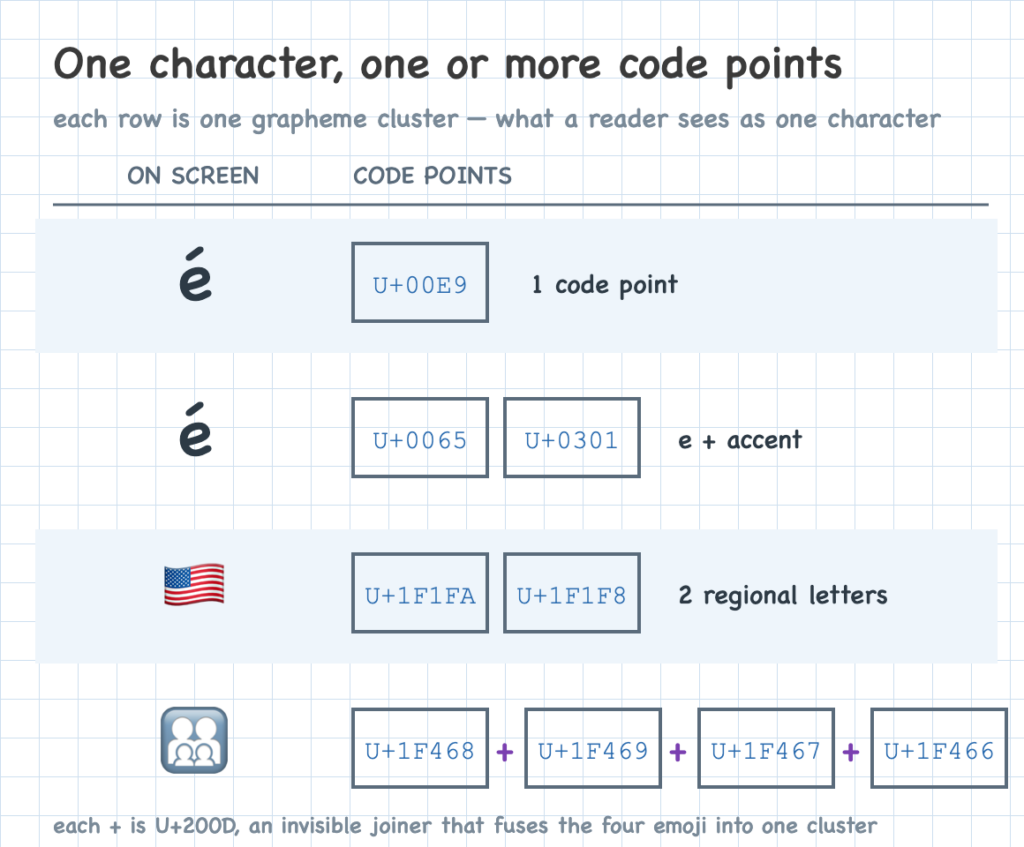
Emoji lean on this hard. The US flag is a pair of regional-indicator letters, and a family like 👨👩👧👦 fuses a man, woman, girl, and boy with an invisible joiner (U+200D) between each — one character on screen, several code points underneath. So what a person calls one character might be a single code point or a whole cluster of them, and the grapheme cluster is the unit that matches what they actually see.
Either way, it’s all code points underneath, and a code point is just a number. A computer doesn’t store numbers the way we write them, so to see how text is actually stored, we first need to look at how computers handle numbers at all.
A Primer on Bits and Bytes
Now we can turn to how these codes are actually stored on a computer — where the term UTF-8 comes in, which you may have run across before. Getting there takes a little background on how bits and bytes work first. If that’s already familiar, skip ahead to the “Encoding Text as Bytes” section below. But as we know, there are 10 kinds of people: those who understand binary and those who don’t. If you don’t get that joke, read on.
A computer stores everything as bits — 0s and 1s — and a group of bits is just a number written in binary. To see how that works, it helps to start from the counting we already know.
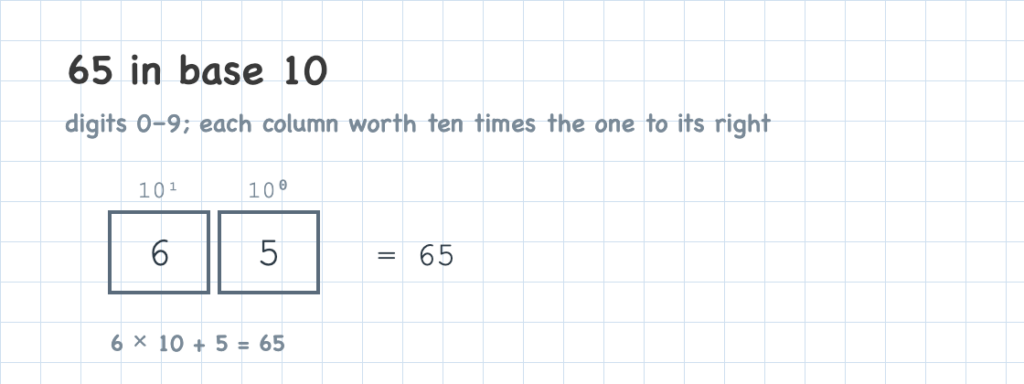
We write numbers in base 10: each column holds a digit from 0 to 9, and every column to the left is worth ten times more — ones (10⁰), tens (10¹), hundreds (10²), and so on.
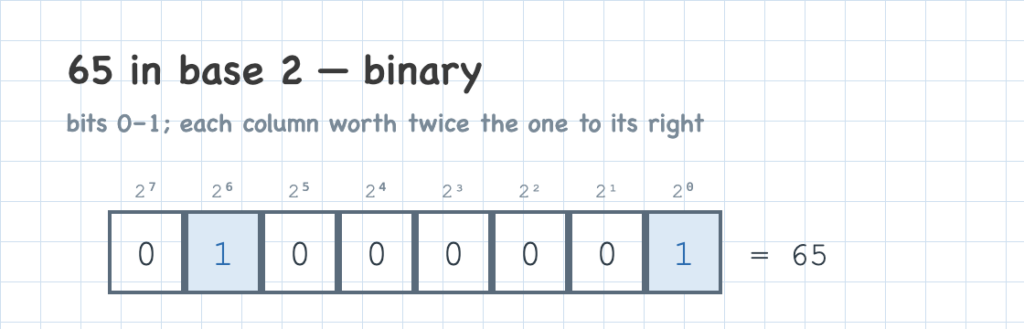
Computers use the same idea in base 2, called binary: each column holds only 0 or 1, and every column to the left is worth twice as much — 2⁰, 2¹, 2², and so on. So everything a computer stores is a number, written as a row of bits.
The same idea extends to hexadecimal, base 16. Each column holds a digit from 0 to 15, written 0–9 and then A–F (A is 10, F is 15), and every column to the left is worth sixteen times more.
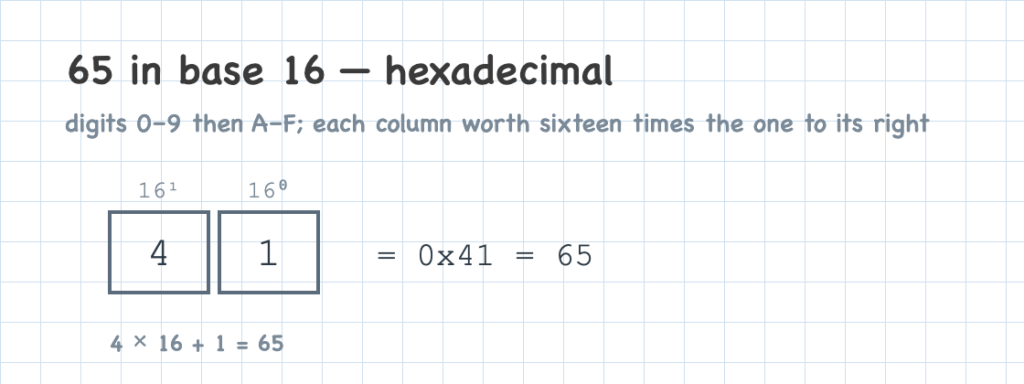
Hex and binary go hand in hand. One hex digit stands for exactly four bits, so a byte — eight bits — is always two hex digits. That makes hex a compact shorthand for binary: instead of writing out 00011010, you can write 0x1A, where the 0x prefix just marks a hex number.

Both show up in this article. We’ll lean on hex because it’s shorter to write, and switch to binary only when the individual bits matter. Converting between them is mechanical — plenty of calculators do it, and with a little practice you can do it by hand.
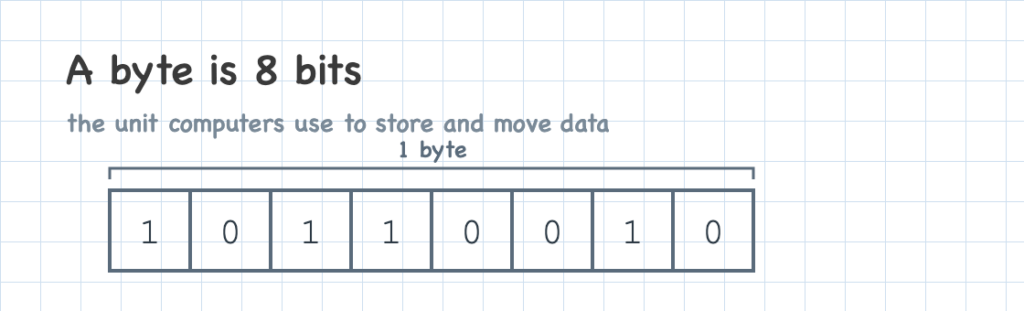
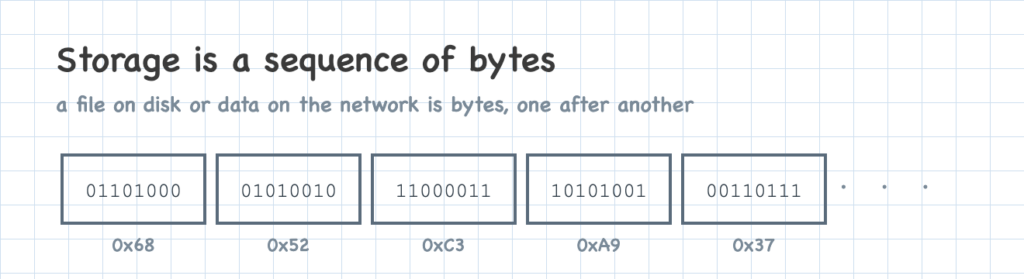
Now that we have the language computers think in — binary — we can look at the unit they group it into: the byte. A byte is a group of 8 bits, and it’s the unit computers use for storage — you store a byte, read a byte, address a byte, rather than handling bits one at a time.
A file on disk or data sent over a network is just a long sequence of bytes. That shared unit is how both the computer and we measure and talk about data — kilobytes, megabytes, and the rest all build from the byte.
A byte only goes so far. Eight bits can hold 256 different values — 0 through 255 — so any number larger than 255 has to spread across more than one byte. Take 700: in binary it’s 1010111100, ten bits — more than one byte holds. It goes into two bytes that together make 700.
💡 When a number spans several bytes like this, those bytes can be laid out in either order — most-significant byte first or last, a choice called endianness — so systems exchanging data have to agree on which they use.

Splitting a large number across bytes, with an agreed endianness, is the standard, all-purpose way to store any number. Text could ride on it too — each character is a code point, which is a number. But text is common enough to get its own standard, one tuned to store it compactly. The next section builds that standard up from scratch.
Encoding Text as Bytes
Now that we know computers work in numbers and how they store them, we can get to the real goal: storing and moving text — saving it to a file, sending it over a network, holding it in memory. Each of those needs the text as bytes, and a code point is a number, so encoding text means turning each code point into bytes. Unicode defines a few encodings for this, and by far the most common is UTF-8. We’ll build it up slowly — starting from a naive first attempt — so its rules make sense instead of appearing from nowhere.
A first attempt: one fixed size
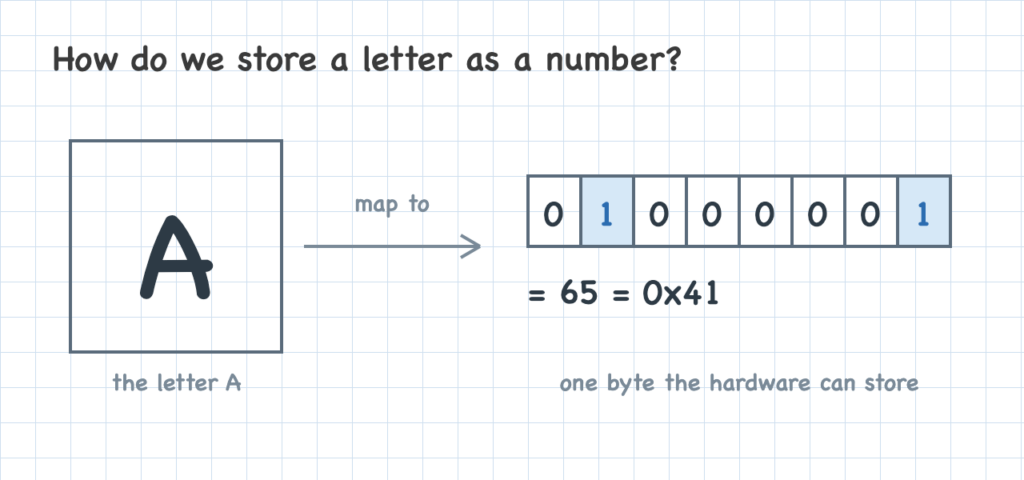
Take the letter A. It’s code point U+0041, the number 65 — small enough to fit in a single byte: 01000001.
Most code points are far bigger than 255, though, so they won’t fit in one byte. An encoding is the rule that turns a code point into bytes, and back. There’s more than one way to write that rule, and the choice matters: disk space costs money and sending data over a network takes bandwidth, so how compactly an encoding packs code points into bytes carries a real cost. Some are efficient, some wasteful. Let’s think it through, starting with the simplest approach.
The simplest encoding is to reserve more than enough space for any code point — the same amount for every one. Code points run up to U+10FFFF, which needs 21 bits, so round up to 4 bytes (32 bits) each. Write each code point as its 4-byte binary number and lay the results end to end. That byte sequence is what you write to disk, hold in memory, or send over the wire — in big-endian or little-endian order, as before, so both sides agree.
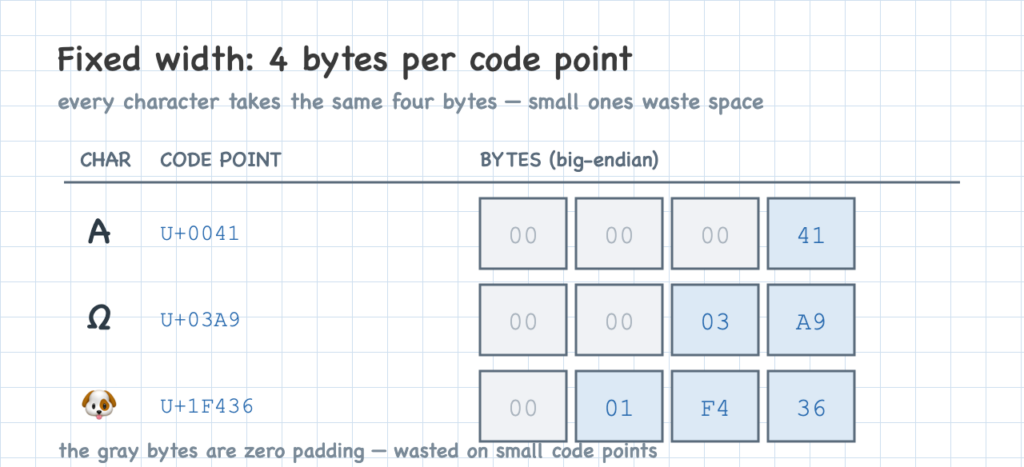
The upside is simplicity. Every character takes the same four bytes, with no exceptions or complications. That makes the bytes easy to reason about: to count the characters in a chunk of bytes, just divide by four — 40 bytes is 10 characters. And you can jump straight to any character, since you know exactly which bytes it occupies: the first three characters are the first twelve bytes, no scanning required.
The downside is wasted space. The letter a is one of the most common characters in English, yet it gets the same 4 bytes as a rarely used emoji. Nearly all English text is ASCII, which needs only 1 byte, so a fixed 4-byte width inflates it by 4×. And it adds up: 4× the bytes means 4× the storage and 4× the data on the wire — slower transfers and more latency on every page, file, and request.
The naive approach is still worth walking through, because it shows how an encoding could work. The space problem has an obvious fix: spend fewer bytes on the common, small code points, and reach for more only when a code point needs them.
A more efficient encoding
Let’s design a variable-width encoding ourselves, one decision at a time.
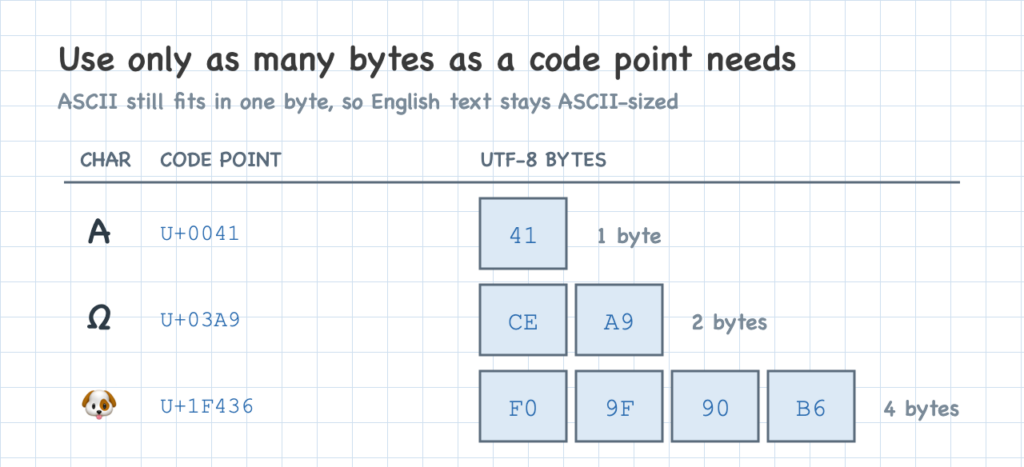
Start with the first step: use only as many bytes as a code point needs. Small code points get one byte; larger ones get two, three, or four. The range U+0000 through U+007F covers the original ASCII characters, and every one of those fits in a single byte. So plain English text stays exactly the size it was in ASCII.
That immediately raises a problem. Imagine reading the bytes one by one, trying to recover the text: how do you tell when a byte starts a new character, versus when it’s part of a character that takes several bytes? With a fixed four bytes each, you never had to ask — a new character began every fourth byte. Now that widths vary, a byte on its own gives no clue.
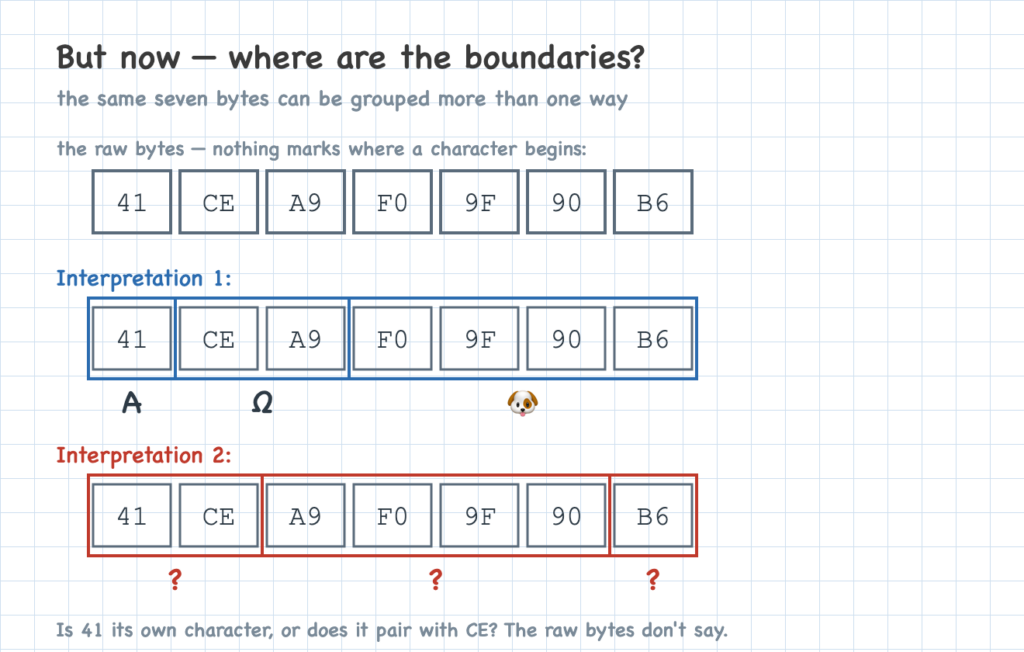
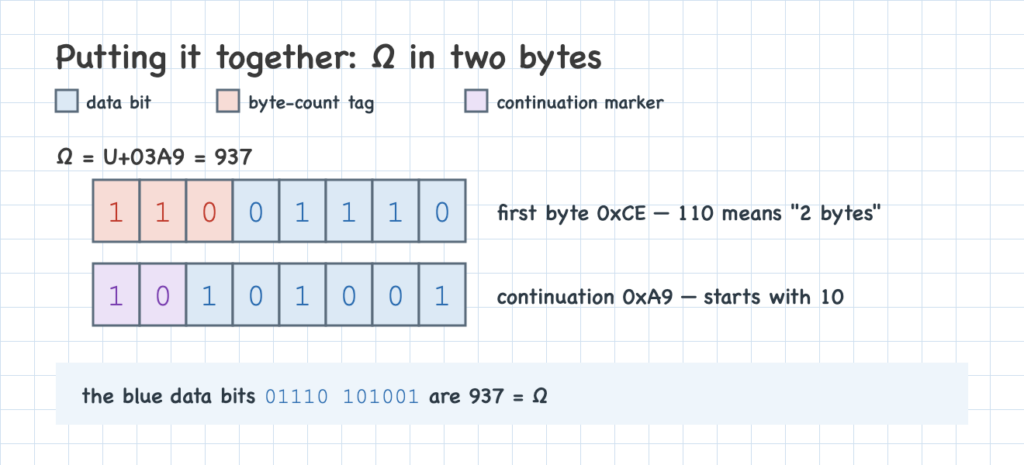
To work out a fix, let’s follow a single character: the Greek letter Ω (omega).
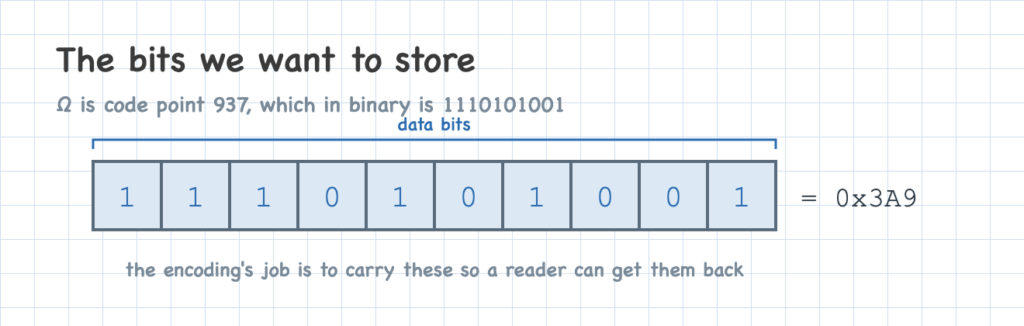
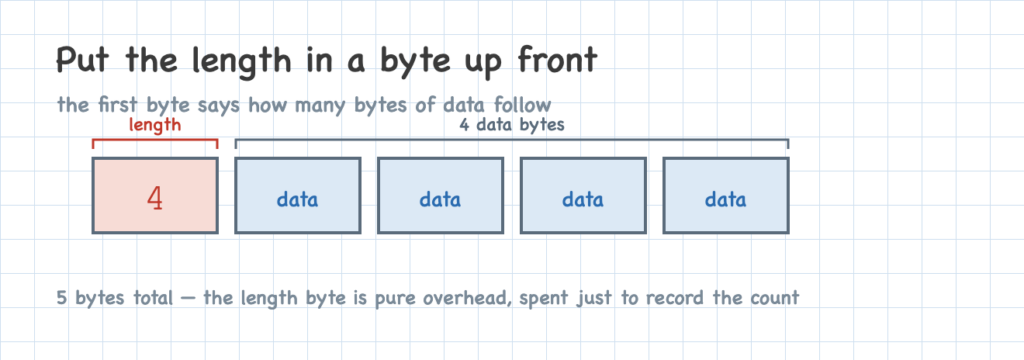
The simplest way to mark the boundaries is to put a byte in front that says how many bytes follow for a code point. It’s like a little marker that tells you what’s coming. That first byte is a count (red below); the bytes after it hold the code point’s data (blue). A value that needs four bytes of data takes a length byte plus those four data bytes — five bytes in all.
We can optimize this a little by not wasting a whole byte on the count. Instead, we put the count in the bits on the leading side of the first byte, which leaves room for data bits after it: a leading 0 means a one-byte character, 110 means two bytes, 1110 means three, and 11110 means four. The patterns are chosen cleverly to stay unambiguous — the leading bits alone tell you the length, and no count can be mistaken for another.
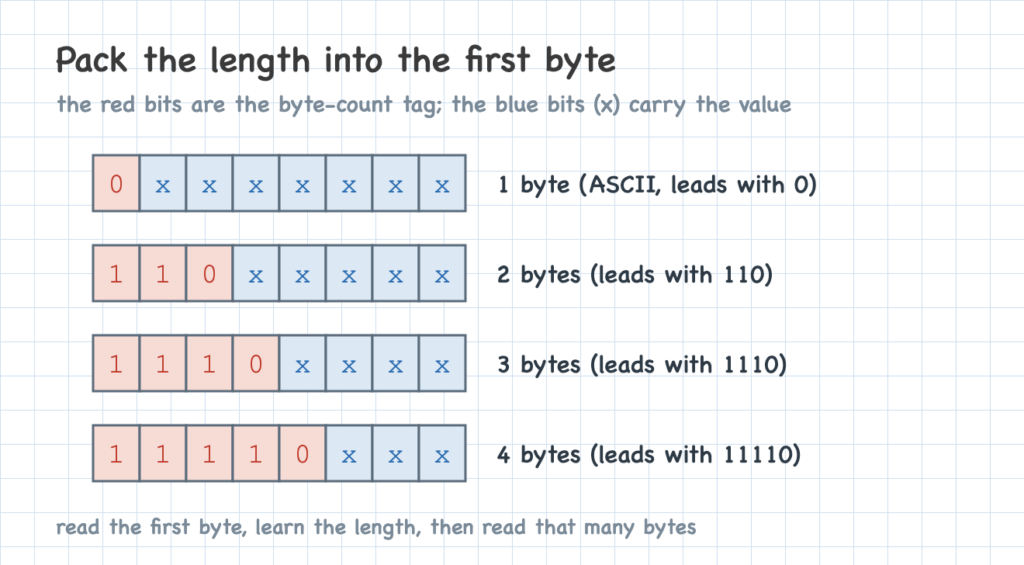
The one-byte form has a nice property worth pausing on. Its layout — a leading 0 followed by seven data bits — is exactly how ASCII already stores a character. So every ASCII character encodes to the identical single byte in UTF-8, which means any existing ASCII file is already valid UTF-8, unchanged.
Now the bytes that follow. We mark each one the same way — a little indicator at the front — this time with 10, which says “I’m not a count, I’m continuing the character.” Any byte starting with 10 is mid-character, and any other byte begins a new one, so you can always tell where a character starts.
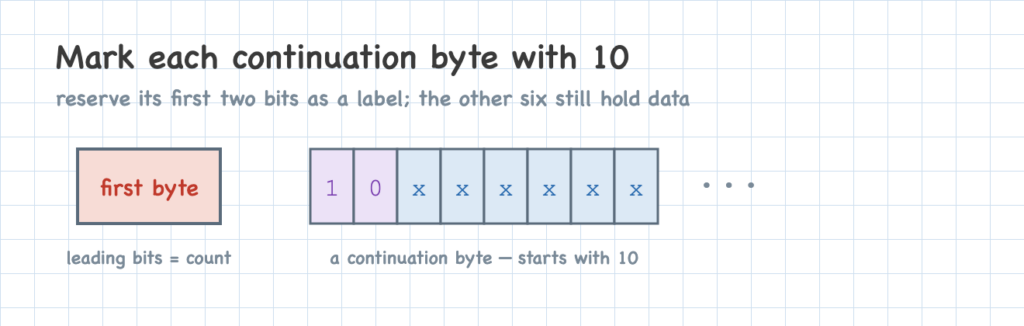
Here’s the payoff. Once the count sits in the first byte’s leading bits, the rest of that byte is free — so we let it carry data too, wasting nothing. Putting it together: the first byte’s leading bits give the length and its remaining bits hold data, and each continuation byte holds six more. Here are Ω’s ten bits packed into two bytes, sitting in the low slots with a single zero padding the top. The last color is purple: the 10 that opens the continuation byte.
Those two rules are the whole of UTF-8: a length tag in the leading bits of the first byte, plus continuation bytes prefixed with 10.
The downsides are the price of variable width. The easy math is gone: because characters vary in size, you can’t count them by dividing, and you can’t jump to the tenth character without walking the bytes from the start to find where it begins. Decoding also takes more work than reading fixed-size slots.
From Character to Bytes
Those are real costs, but UTF-8 earns them. It has become the dominant text encoding: the default on the web, and the native encoding in most modern programming languages.
Step back and the whole path comes into view. Unicode gives a character a code point, a single agreed-on number. That number is written in binary and grouped into bytes. And an encoding — UTF-8 — turns it into the exact bytes saved to a file, held in memory, or sent over a network.
Once you know what’s underneath, you start noticing it. The U+1F600 behind an emoji is a code point. A file larger than its character count is holding multi-byte characters. And when “café” shows up as “café”, you know something messed up the encoding.
That’s the reward for going bit by bit. The letters you are reading right now became code points, then bits, then UTF-8 bytes on the way to your screen — and now you know each step of that trip.


