Tag Archives: Swift

Conditional Expressions in Swift

The first time I saw an if sitting on the right side of an =, I assumed it was a typo. It isn’t: since Swift 5.9 an if or switch can produce a value directly instead of just branching to a block of code. These are called conditional expressions, something Kotlin, Rust, Scala, and Ruby have had for years. Here it is in Swift:

let label = if temperature < 68 {
    "Too cold"
} else if temperature <= 72 {
    "Perfect"
} else if temperature <= 85 {
    "Warm"
} else {
    "Too hot"
}

The question is when to reach for a conditional expression, instead of a plain if or switch, or the ternary, which has done that job all along.

But first, the basics: what is an expression? What are branch statements like if and switch?
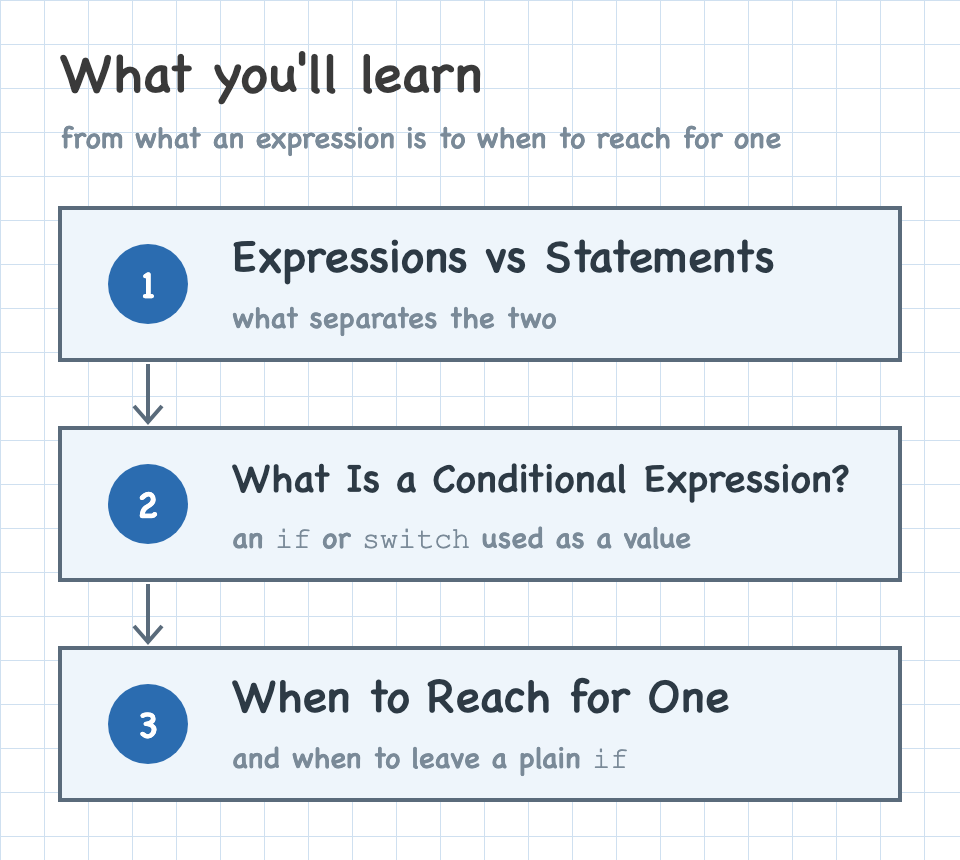
A roadmap of three steps: expressions vs statements, what a conditional expression is, then when to reach for one

Expressions vs Statements

What is an expression?

An expression is a piece of code that evaluates to a value.

KindExample
Literal85
Variabletemperature
Function callmax(68, temperature)
Ternarytemperature > 85 ? "Too hot" : "Not too hot"

Because an expression produces a value, it can appear anywhere the language expects one: the right side of an =, an argument to a function, the value after return. A quick way to check whether something is an expression is to ask whether you could assign it to a variable.

What are control flow statements?

A statement is an instruction that tells the program to do something. Swift names a few kinds: simple statements, compiler control statements, and control flow statements.

Control flow statements are the group we care about here. They manage execution order: loops, control transfer like return and break, and branch statements. A branch statement picks one of several blocks of code to run; Swift has three: if, switch, and guard.

func checkTemperature(_ temperature: Int) {
    if temperature < 68 {
        print("Too cold")
    } else if temperature > 85 {
        print("Too hot")
    } else {
        print("Warm enough")
    }
}

What Is a Conditional Expression?

On their own, if and switch are branch statements: they run a block of code but don’t produce a value. A conditional expression is an if or switch placed where a value is expected, so the whole thing evaluates to a value you can assign:

let label = if temperature < 68 {
    "Too cold"
} else if temperature <= 72 {
    "Perfect"
} else if temperature <= 85 {
    "Warm"
} else {
    "Too hot"
}

A switch works the same way:

let label = switch temperature {
case ..<68:   "Too cold"
case 68...72: "Perfect"
case 73...85: "Warm"
default:      "Too hot"
}

Besides assignment, a conditional expression can supply the value returned by a function, a closure, or a computed property’s getter:

func label(for temperature: Int) -> String {
    if temperature < 68 {
        "Too cold"
    } else {
        "Warm enough"
    }
}

let describe: (Int) -> String = { temperature in
    if temperature < 68 {
        "Too cold"
    } else {
        "Warm enough"
    }
}

var label: String {
    if temperature < 68 {
        "Too cold"
    } else {
        "Warm enough"
    }
}

All three bodies are identical. A single-expression body returns its value implicitly, so none of them needs a return. Writing return if temperature < 68 { … } explicitly works too.

A throw can also take a conditional expression, which supplies the error:

func reject(_ temperature: Int) throws {
    throw if temperature < -100 {
        TemperatureError.tooCold
    } else {
        TemperatureError.tooHot
    }
}

A conditional expression can’t go everywhere an ordinary expression can. It can’t be an argument to a function, and it can’t be part of a larger expression:

print(if temperature < 68 { "Too cold" } else { "Warm" })
// ❌ error: 'if' may only be used as expression in return, throw, or as the source of an assignment

let x = 1 + (if temperature < 68 { 3 } else { 4 })
// ❌ error: 'if' may only be used as expression in return, throw, or as the source of an assignment

Each branch is a single expression

A branch that produces a value is just that value: no intermediate let, no print, no assignment allowed. The print below breaks that:

let label = if temperature < 68 {
    print("checking the temperature")
    "Too cold"
} else {   // ❌ error: non-expression branch of 'if' expression may only end with a 'throw'
    "Warm enough"
}

No return in a branch

Writing return in each branch doesn’t work:

let label = if temperature < 68 {
    return "Too cold"   // ❌ error: cannot use 'return' to transfer control out of 'if' expression
} else {
    "Warm enough"
}

break and continue are rejected the same way.

It must be exhaustive

An if expression needs a final, unconditional else; it can’t end on an else if:

let label = if temperature < 68 {   // ❌ error: 'if' must have an unconditional 'else' to be used as expression
    "Too cold"
} else if temperature > 85 {
    "Too hot"
}

I’d argue you usually want a final else anyway for clarity, but that’s another matter.

A switch expression must cover every case the same way.

A branch can throw or never return

Besides producing a value, a branch may throw instead:

func label(for temperature: Int) throws -> String {
    if temperature > -100 {
        "In range"
    } else {
        throw TemperatureError.outOfRange
    }
}

This differs from the throw if earlier, where the whole expression evaluated to an error. Here it evaluates to a String, and one branch throws instead of producing one.

You don’t put try in front of the if; that gets you a warning, 'try' has no effect on 'if' expression.

A throwing branch is the only exception to the single-expression rule. Since it never produces a value, it can run whatever it needs to before throwing:

func label(for temperature: Int) throws -> String {
    if temperature > -100 {
        "In range"
    } else {
        let delta = -100 - temperature
        print("out of range by \(delta)°")
        throw TemperatureError.outOfRange
    }
}

A branch that calls a function that never returns, like fatalError(), also produces no value, so the type of the other branch becomes the type of the whole expression:

let count = if let cached {
    cached
} else {
    fatalError("cache was never populated")
}
// count: Int

They nest

A branch can itself be a conditional expression (or a ternary):

let label = if temperature < 68 {
    if humid {
        "Too cold and damp"
    } else {
        "Too cold"
    }
} else {
    "Warm enough"
}

Why Use a Conditional Expression?

It helps to compare the traditional ways to derive a value from a conditional statement with what a conditional expression does instead.

Concise conditionals

A conditional that exists only to produce a value carries repetition that adds nothing: the same label = assignment on every branch. A conditional expression drops it. Here’s the statement version:

let label: String
if temperature < 68 {
    label = "Too cold"
} else if temperature <= 72 {
    label = "Perfect"
} else if temperature <= 85 {
    label = "Warm"
} else {
    label = "Too hot"
}

Compare that to a conditional expression, where the assignment happens once and each branch is only its value:

let label = if temperature < 68 {
    "Too cold"
} else if temperature <= 72 {
    "Perfect"
} else if temperature <= 85 {
    "Warm"
} else {
    "Too hot"
}

With a plain if, a branch can also run other statements before it assigns. This one estimates how long the thermostat needs before it reaches the target:

let label: String
if isHeating {
    let minutes = (target - temperature) * 4
    label = "Heating, about \(minutes) min"
} else if isCooling {
    let minutes = (temperature - target) * 6
    label = "Cooling, about \(minutes) min"
} else {
    label = "At target"
}

A conditional expression doesn’t allow this: no let binding, no statement before the result. The computation moves into a named function, and each branch is a condition and its value again:

func heatingLabel(from temperature: Int, to target: Int) -> String {
    let minutes = (target - temperature) * 4
    return "Heating, about \(minutes) min"
}

func coolingLabel(from temperature: Int, to target: Int) -> String {
    let minutes = (temperature - target) * 6
    return "Cooling, about \(minutes) min"
}

let label = if isHeating {
    heatingLabel(from: temperature, to: target)
} else if isCooling {
    coolingLabel(from: temperature, to: target)
} else {
    "At target"
}

I’d argue this is often clearer on its own merits. The conditional is left doing one job, deciding which case applies, and the arithmetic that produces each value has a name and somewhere to be tested. Mixing the two means reading a formula to work out which branch you’re in.

It isn’t always worth it. Here the computation is a single subtraction:

let label: String
if temperature < 68 {
    let delta = 68 - temperature
    label = "Too cold by \(delta)°"
} else {
    label = "Warm enough"
}

Pulling that out into a coldLabel(temperature) function to satisfy the rule buys nothing and costs a jump to another place in the file. Leave that one a plain if.

Cleaner than a nested ternary

I’m not a fan of nested ternaries. They remind me of a server who won’t write your order down, trusting their memory to impress the table. Often enough the order comes back wrong, and you wish they’d written it down. A nested ternary is the same: writing one shows you can hold a dense line in your head, but a bug in it is easy to miss.

Here’s the temperature label as a nested ternary:

let label = temperature < 68 ? "Too cold" : temperature <= 72 ? "Perfect" : temperature <= 85 ? "Warm" : "Too hot"

The same logic as an if expression:

let label = if temperature < 68 {
    "Too cold"
} else if temperature <= 72 {
    "Perfect"
} else if temperature <= 85 {
    "Warm"
} else {
    "Too hot"
}

Each condition sits next to its result, in the order they’re checked — no chain of : to trace back through.

A switch expression reads even better here, since the ranges line up as cases:

let label = switch temperature {
case ..<68:   "Too cold"
case 68...72: "Perfect"
case 73...85: "Warm"
default:      "Too hot"
}

So should conditional expressions replace ternaries everywhere? No. A simple two-way ternary I’d leave alone:

let label = temperature > 85 ? "Too hot" : "Not too hot"

The same thing as a conditional expression takes four more lines and reads no better:

let label = if temperature > 85 {
    "Too hot"
} else {
    "Not too hot"
}

Save conditional expressions for the cases where the ternary would nest.

One difference to know about before converting a ternary: the two sides of a ternary get unified into a single type, but the branches of a conditional expression are type-checked independently and have to already agree. So this ternary is fine:

let adjustment = temperature > 85 ? 0 : 1.5   // adjustment: Double

and the same thing as an if expression isn’t:

let adjustment = if temperature > 85 {
    0   // ❌ error: branches have mismatching types 'Int' and 'Double'
} else {
    1.5
}

The fix is to name the type:

let adjustment: Double = if temperature > 85 {
    0
} else {
    1.5
}

No silently unhandled case

With a plain if/else, a common pattern is to declare a var with a default, then set it inside the branches:

var label = ""
if temperature < 68 {
    label = "Too cold"
} else if temperature > 85 {
    label = "Too hot"
}

The whole 68–85 range never got handled, so at 80° label silently stays "" — the wrong answer, and nothing flags it.

The real problem here is a missing else, a plain bug. A cleaner way to write the traditional version is a let with no default:

let label: String
if temperature < 68 {
    label = "Too cold"
} else if temperature > 85 {
    label = "Too hot"
}
print(label)   // ❌ error: constant 'label' used before being initialized

Now the compiler catches it: with no default to fall back on, reading label on a path that never assigned it won’t build. That’s the better pattern. But it depends on the author choosing it; the next person who writes var label = "" is back to the silent bug.

A switch statement helps, since it forces you to cover every case. But covering a case isn’t the same as assigning in it — a default: break leaves label at "" just the same:

var label = ""
switch temperature {
case ..<68:   label = "Too cold"
case 68...85: label = "Warm enough"
default:      break
}
print(label)   // "" at 90° — every case covered, nothing assigned

With an if, a conditional expression makes the compiler enforce it, so it holds no matter who writes it. That’s the exhaustiveness rule from earlier:

let label = if temperature < 68 {
    "Too cold"
} else if temperature <= 72 {
    "Perfect"
} else if temperature <= 85 {
    "Warm"
} else {
    "Too hot"   // required — without this else, it won't compile
}

When to Reach for One

Conditional expressions didn’t add anything you couldn’t write before. They took a pattern that was already common, a conditional that exists only to pick a value, and gave it syntax that drops the repetition and makes the compiler check every case.

Use one when that’s the case, and especially when the alternative is a nested ternary. Skip it for a simple two-way ternary, or when a branch has work to do before it has a value.

An if on the right side of an = still catches my eye, but it doesn’t look like a typo anymore.
Unicode, Bit by Bit

Not long ago I was digging through the string API of a programming language and fell down a rabbit hole into Unicode. I ran little experiments, took a pile of notes, and came away understanding far more than I set out to. This article is my attempt to capture those learnings — the details of how the world’s computers share text — in case they help someone else.

I wrote it for non-programmers too. If you’ve ever wondered how the letters you’re reading right now become something a machine can store and send, that’s what Unicode answers.

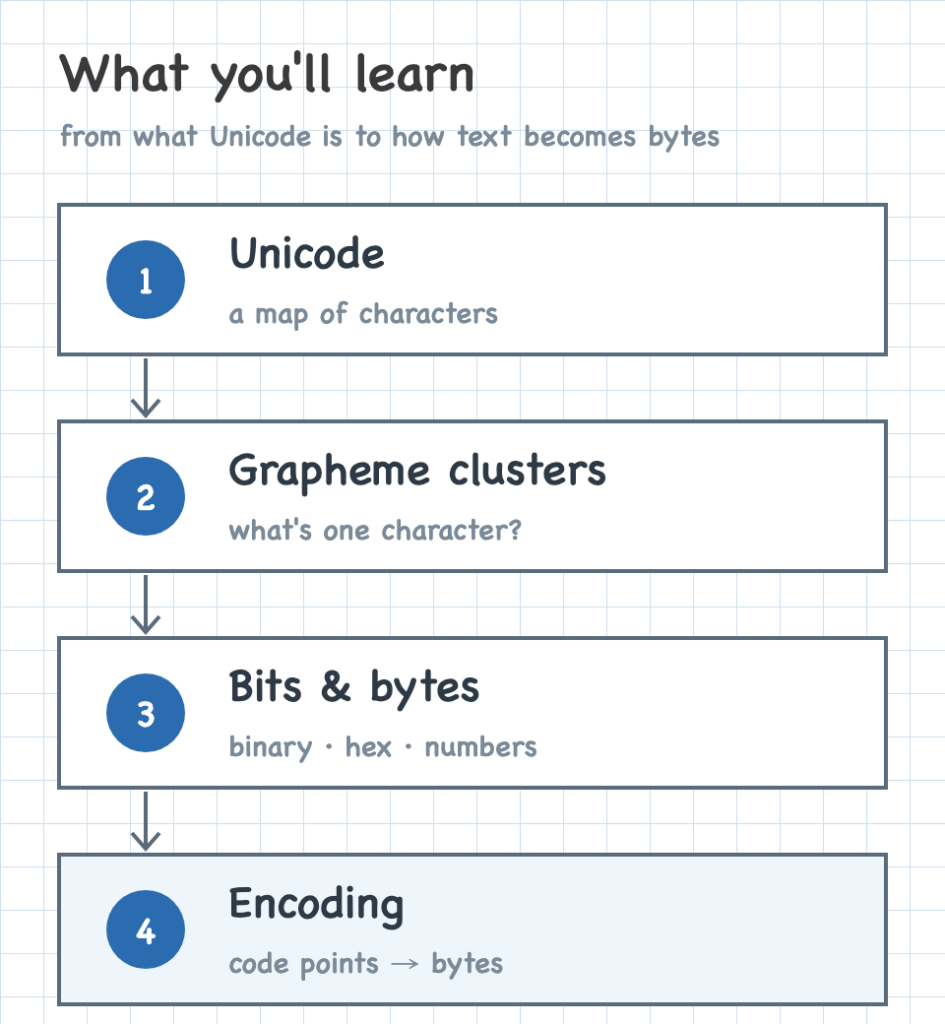
I go deep, but I build up from very basic principles: what Unicode is, what counts as a single character, and how text finally turns into bytes.

A roadmap of four steps: Unicode, grapheme clusters, bits and bytes, then encoding text as bytes

Unicode: A Map of Characters

The world has thousands of languages, each with its own characters — letters, accents, marks, and symbols. To work with text from any of them, a computer needs one universal way to catalog every character there is.

Think of a single, giant map with a numbered slot for every character, one map that everyone shares. It has room to grow: new characters take new slots as needs arise — emoji, for one, didn’t exist when the map began, and they simply claimed fresh slots.

Before such a map, every system had its own. ASCII numbered 128 characters, enough for English and little else; Latin-1 covered Western European accents, Shift-JIS covered Japanese, and many more each numbered their own languages. The same number meant different characters from one map to the next, so a file was unreadable unless you already knew which map produced it.

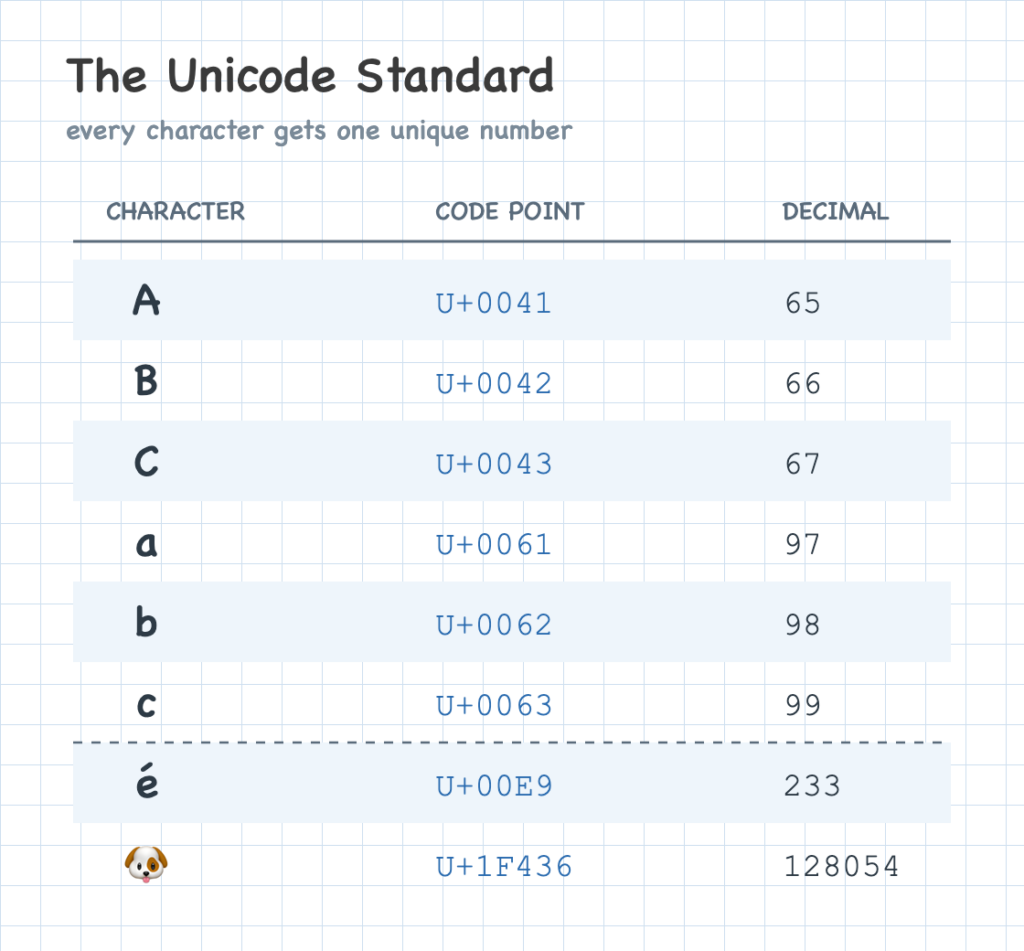
Unicode — officially “The Unicode Standard” — is that shared map. The name is a fair summary: *uni* for universal, one map for every language, and *code* because each character gets its own code, a number. That number is a code point; whenever you see “code point,” just think “the number for that character.” A code point is written with a U+ prefix and its value in hexadecimal — a compact notation we’ll get to shortly — so “A” is U+0041. Each code point names one entry in the map: a letter, a digit, a mark, or a symbol.

A partial Unicode table mapping characters to their code points and decimal values

Unicode covers every writing system in use: Latin, Cyrillic, the CJK scripts for Chinese, Japanese, and Korean, along with mathematical symbols, punctuation, and emoji. One map holds all of them, replacing the old arrangement of a separate map per language.

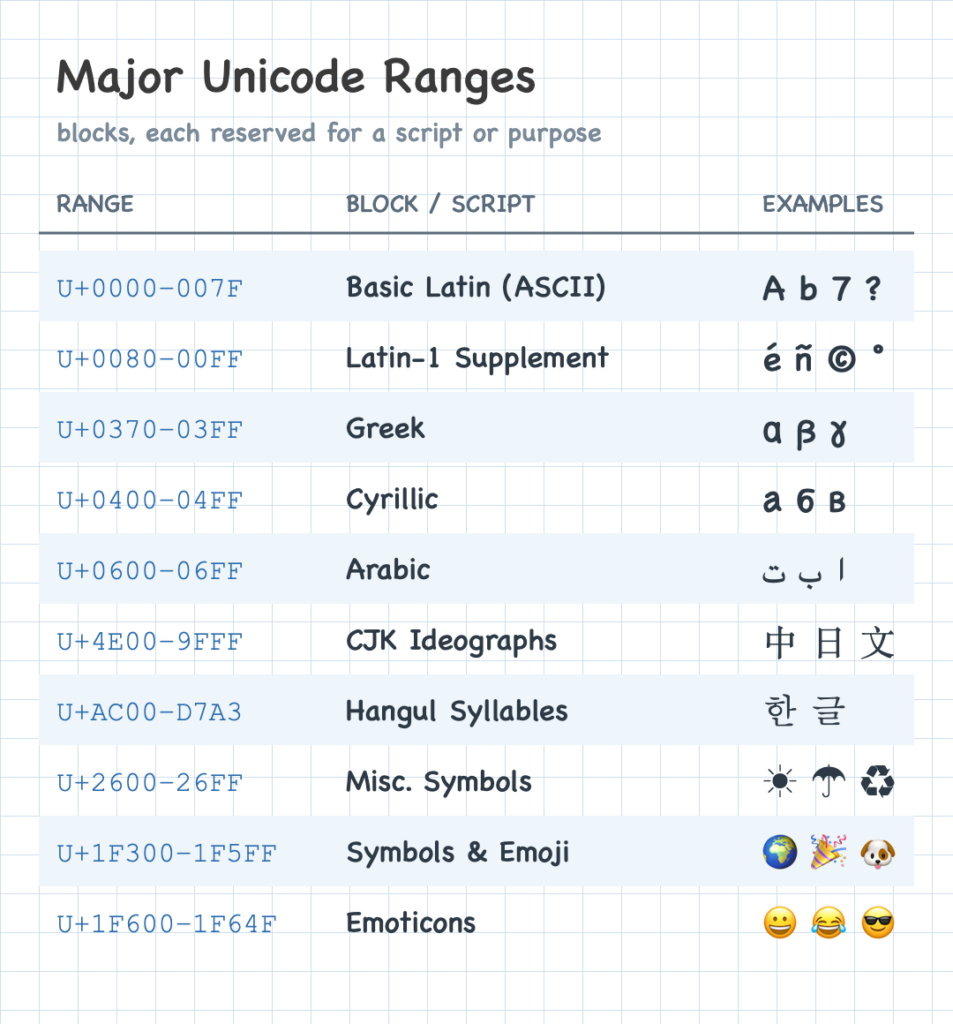
Code points are organized into blocks, each reserved for a particular script or purpose — one for Greek, large blocks for the CJK characters, a block for emoji, and many more. The very first blocks are what let Unicode take over so smoothly.

By the time Unicode arrived, a huge amount of text and software already used ASCII. How could Unicode replace it without breaking all of that? The clever answer: it kept ASCII’s numbers. The first block is exactly ASCII — the letter A is U+0041, decimal 65, the same number ASCII gave it decades earlier — and the block right after it continues with Latin-1. So old ASCII and Latin-1 text still reads correctly as Unicode.

A table of major Unicode ranges and the scripts or symbols each one covers

What Counts as a Character?

Up to now, one code point has meant one character. That’s usually true, but not always.

Sometimes a handful of code points belong together, combining into a single thing a reader sees as one character. You’d probably just call it a character; Unicode gives it a fancier name, the grapheme cluster. The name is literal — a group of code points *cluster* together to form what looks like one character.

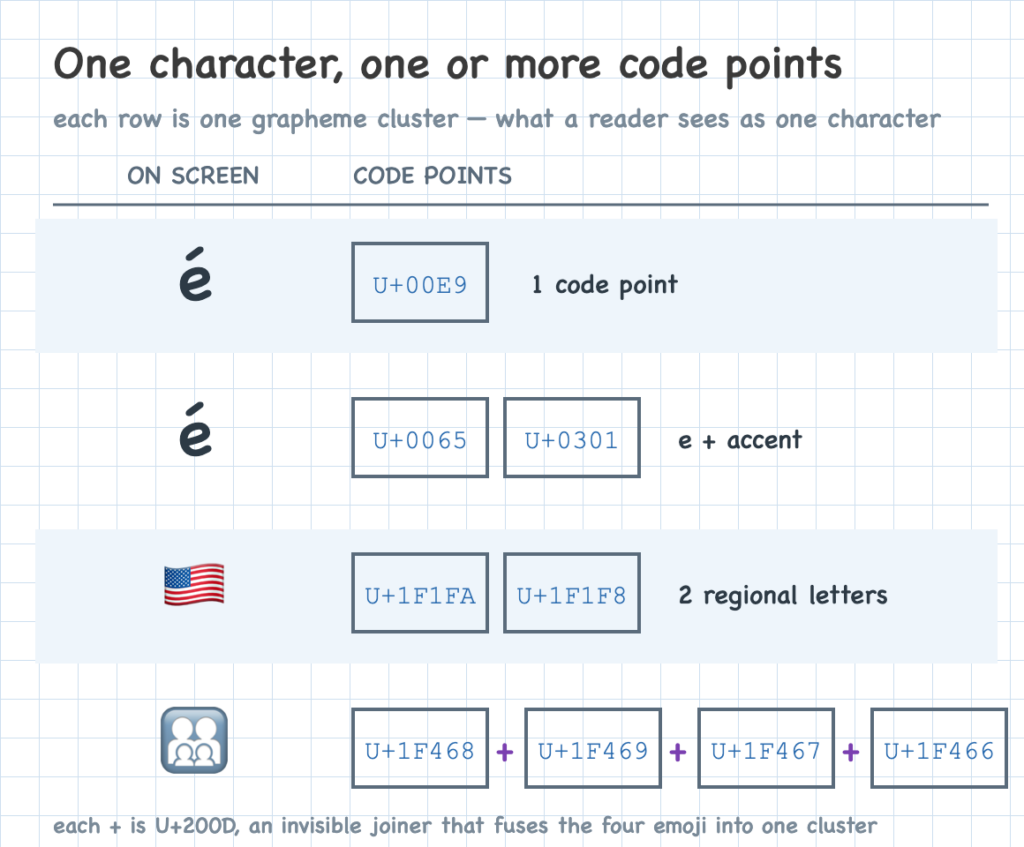
The classic example is é. It can be a single code point (U+00E9), or two — a plain e (U+0065) followed by a combining accent (U+0301) that lands on top of it. On screen they’re indistinguishable, and either way it counts as one grapheme cluster. The grid below shows this, along with two more examples that build on the same idea.

A grid of characters and their code points: é as one code point, é as e plus a combining accent, the US flag as two regional-indicator letters, and a family emoji as four people fused by joiners — each row one grapheme cluster

Emoji lean on this hard. The US flag is a pair of regional-indicator letters, and a family like 👨‍👩‍👧‍👦 fuses a man, woman, girl, and boy with an invisible joiner (U+200D) between each — one character on screen, several code points underneath. So what a person calls one character might be a single code point or a whole cluster of them, and the grapheme cluster is the unit that matches what they actually see.

Either way, it’s all code points underneath, and a code point is just a number. A computer doesn’t store numbers the way we write them, so to see how text is actually stored, we first need to look at how computers handle numbers at all.


A Primer on Bits and Bytes

Now we can turn to how these codes are actually stored on a computer — where the term UTF-8 comes in, which you may have run across before. Getting there takes a little background on how bits and bytes work first. If that’s already familiar, skip ahead to the “Encoding Text as Bytes” section below. But as we know, there are 10 kinds of people: those who understand binary and those who don’t. If you don’t get that joke, read on.

A computer stores everything as bits — 0s and 1s — and a group of bits is just a number written in binary. To see how that works, it helps to start from the counting we already know.

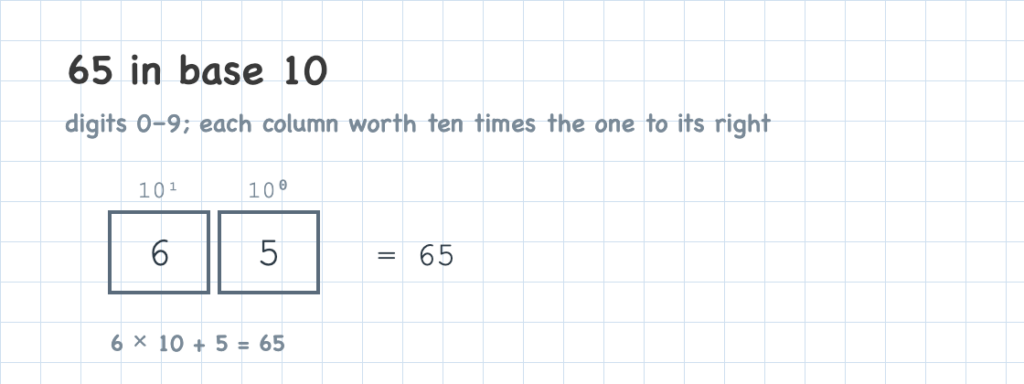
We write numbers in base 10: each column holds a digit from 0 to 9, and every column to the left is worth ten times more — ones (10⁰), tens (10¹), hundreds (10²), and so on.

The number 65 written in base 10

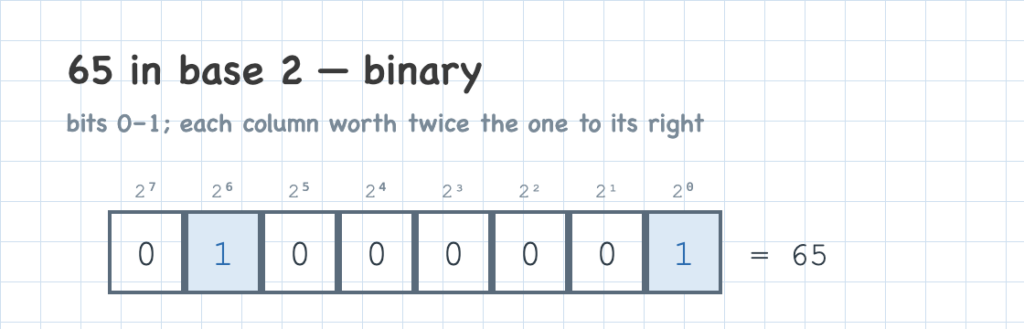
Computers use the same idea in base 2, called binary: each column holds only 0 or 1, and every column to the left is worth twice as much — 2⁰, 2¹, 2², and so on. So everything a computer stores is a number, written as a row of bits.

The number 65 written in binary, base 2

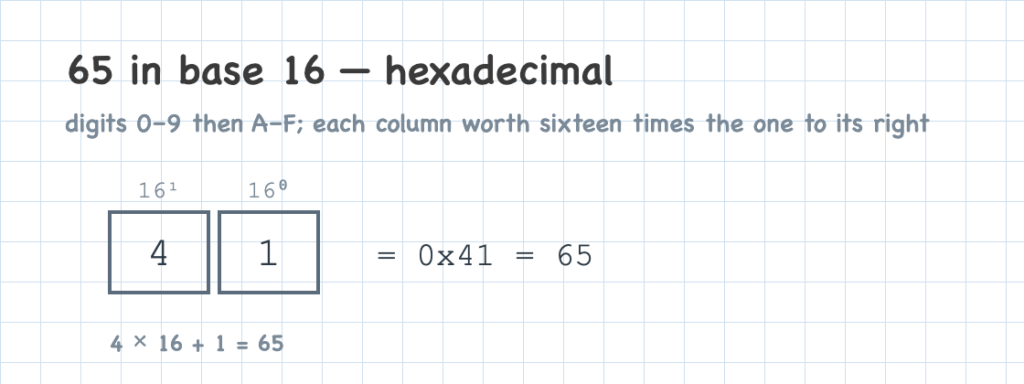
The same idea extends to hexadecimal, base 16. Each column holds a digit from 0 to 15, written 0–9 and then A–F (A is 10, F is 15), and every column to the left is worth sixteen times more.

The number 65 written in hexadecimal, base 16

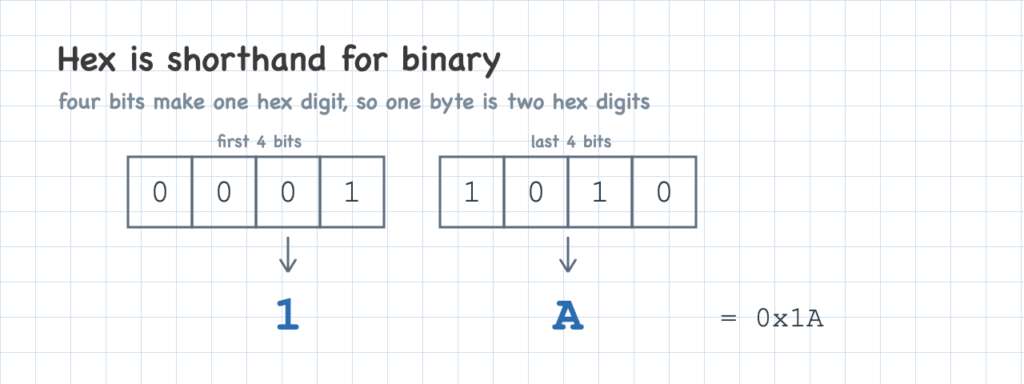
Hex and binary go hand in hand. One hex digit stands for exactly four bits, so a byte — eight bits — is always two hex digits. That makes hex a compact shorthand for binary: instead of writing out 00011010, you can write 0x1A, where the 0x prefix just marks a hex number.

A byte shown as eight bits and as the two hex digits it equals

Both show up in this article. We’ll lean on hex because it’s shorter to write, and switch to binary only when the individual bits matter. Converting between them is mechanical — plenty of calculators do it, and with a little practice you can do it by hand.

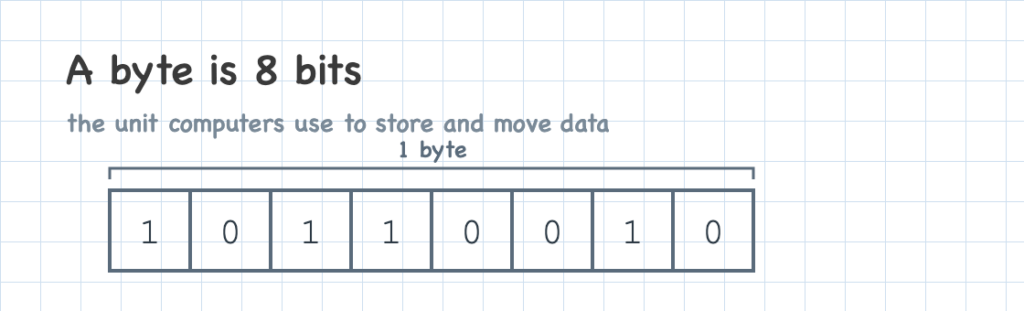
Now that we have the language computers think in — binary — we can look at the unit they group it into: the byte. A byte is a group of 8 bits, and it’s the unit computers use for storage — you store a byte, read a byte, address a byte, rather than handling bits one at a time.

A byte is eight bits grouped together

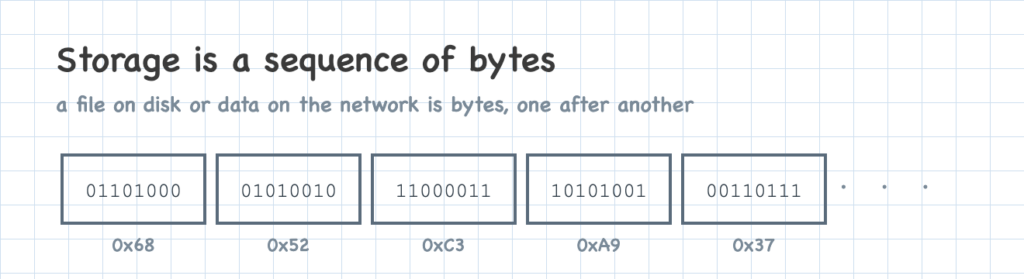
A file on disk or data sent over a network is just a long sequence of bytes. That shared unit is how both the computer and we measure and talk about data — kilobytes, megabytes, and the rest all build from the byte.

Storage as a sequence of bytes, one after another

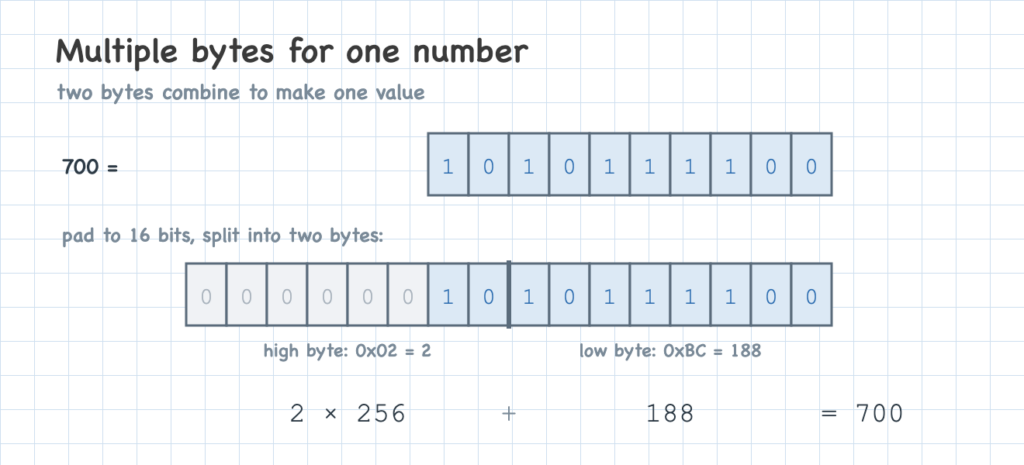
A byte only goes so far. Eight bits can hold 256 different values — 0 through 255 — so any number larger than 255 has to spread across more than one byte. Take 700: in binary it’s 1010111100, ten bits — more than one byte holds. It goes into two bytes that together make 700.

💡 When a number spans several bytes like this, those bytes can be laid out in either order — most-significant byte first or last, a choice called endianness — so systems exchanging data have to agree on which they use.

700 split across two bytes — a high byte (0x02) and a low byte (0xBC) — recombined as 2 × 256 + 188 = 700

Splitting a large number across bytes, with an agreed endianness, is the standard, all-purpose way to store any number. Text could ride on it too — each character is a code point, which is a number. But text is common enough to get its own standard, one tuned to store it compactly. The next section builds that standard up from scratch.


Encoding Text as Bytes

Now that we know computers work in numbers and how they store them, we can get to the real goal: storing and moving text — saving it to a file, sending it over a network, holding it in memory. Each of those needs the text as bytes, and a code point is a number, so encoding text means turning each code point into bytes. Unicode defines a few encodings for this, and by far the most common is UTF-8. We’ll build it up slowly — starting from a naive first attempt — so its rules make sense instead of appearing from nowhere.

A first attempt: one fixed size

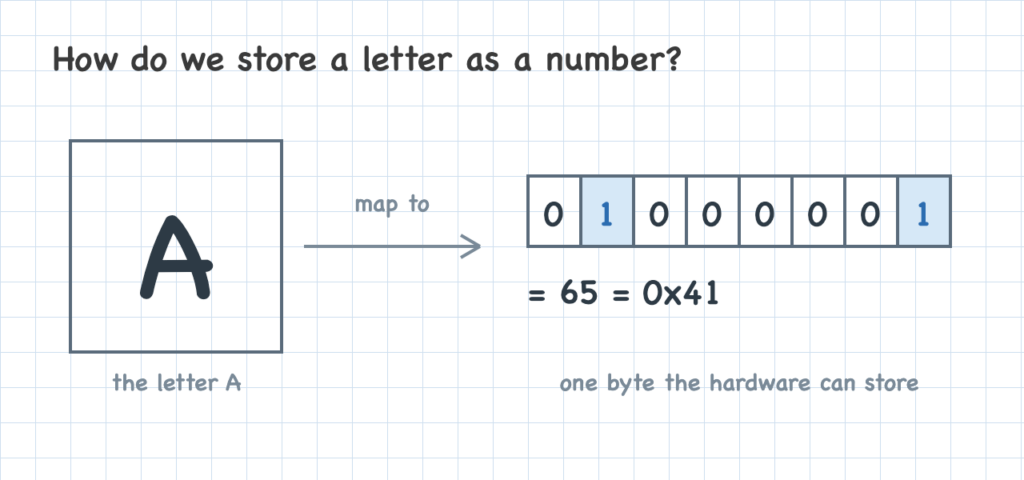
Take the letter A. It’s code point U+0041, the number 65 — small enough to fit in a single byte: 01000001.

The letter A beside the number 65 in a single byte the hardware can store

Most code points are far bigger than 255, though, so they won’t fit in one byte. An encoding is the rule that turns a code point into bytes, and back. There’s more than one way to write that rule, and the choice matters: disk space costs money and sending data over a network takes bandwidth, so how compactly an encoding packs code points into bytes carries a real cost. Some are efficient, some wasteful. Let’s think it through, starting with the simplest approach.

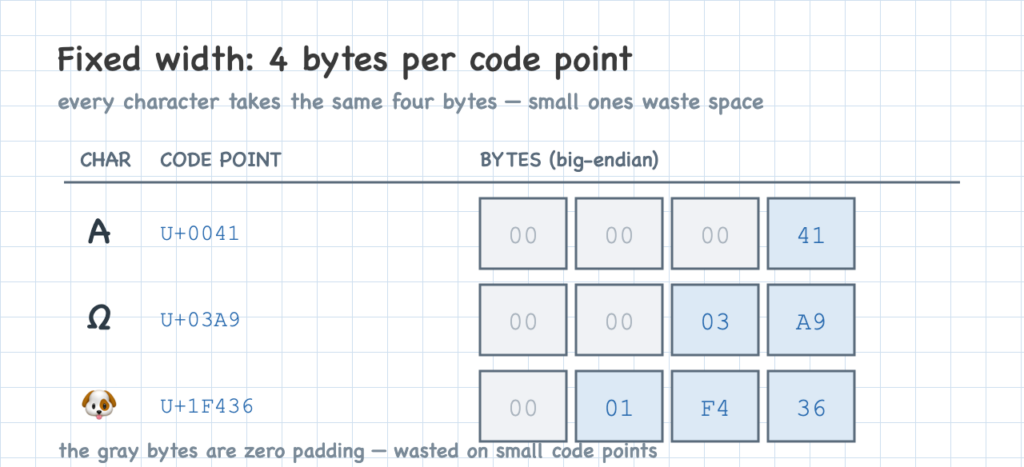
The simplest encoding is to reserve more than enough space for any code point — the same amount for every one. Code points run up to U+10FFFF, which needs 21 bits, so round up to 4 bytes (32 bits) each. Write each code point as its 4-byte binary number and lay the results end to end. That byte sequence is what you write to disk, hold in memory, or send over the wire — in big-endian or little-endian order, as before, so both sides agree.

Three characters stored as fixed 4-byte slots, with the leading zero bytes of small code points marked as wasted padding

The upside is simplicity. Every character takes the same four bytes, with no exceptions or complications. That makes the bytes easy to reason about: to count the characters in a chunk of bytes, just divide by four — 40 bytes is 10 characters. And you can jump straight to any character, since you know exactly which bytes it occupies: the first three characters are the first twelve bytes, no scanning required.

The downside is wasted space. The letter a is one of the most common characters in English, yet it gets the same 4 bytes as a rarely used emoji. Nearly all English text is ASCII, which needs only 1 byte, so a fixed 4-byte width inflates it by 4×. And it adds up: 4× the bytes means 4× the storage and 4× the data on the wire — slower transfers and more latency on every page, file, and request.

The naive approach is still worth walking through, because it shows how an encoding could work. The space problem has an obvious fix: spend fewer bytes on the common, small code points, and reach for more only when a code point needs them.

A more efficient encoding

Let’s design a variable-width encoding ourselves, one decision at a time.

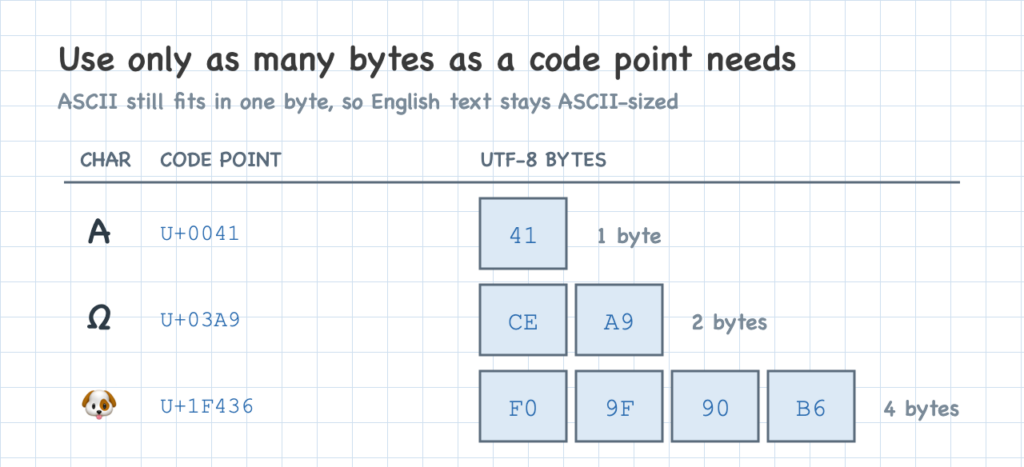
Start with the first step: use only as many bytes as a code point needs. Small code points get one byte; larger ones get two, three, or four. The range U+0000 through U+007F covers the original ASCII characters, and every one of those fits in a single byte. So plain English text stays exactly the size it was in ASCII.

Using only as many bytes as each code point needs, with ASCII in a single byte

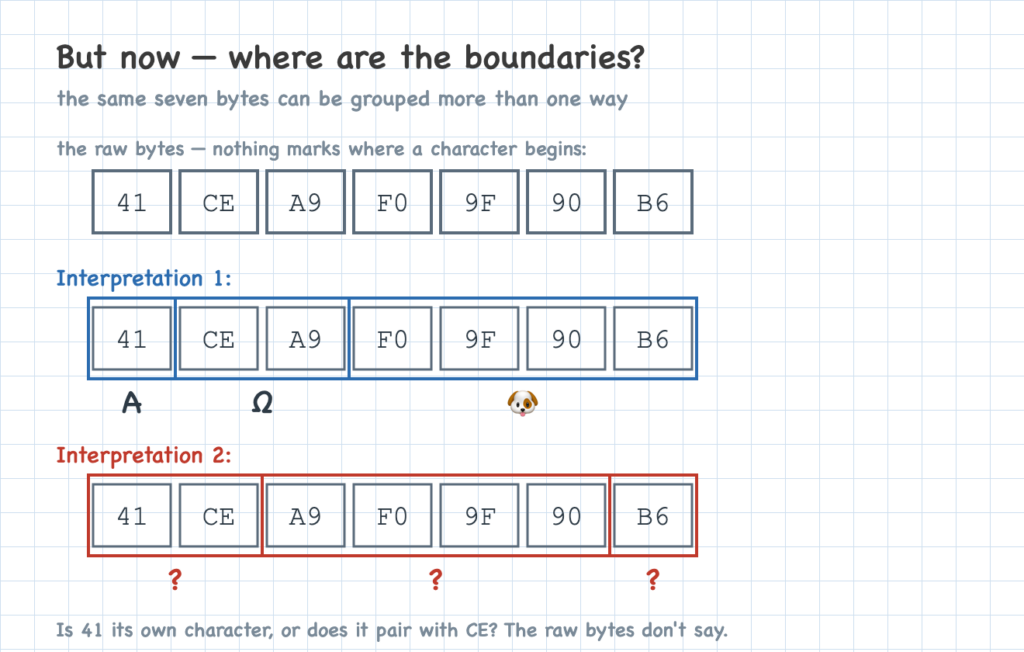
That immediately raises a problem. Imagine reading the bytes one by one, trying to recover the text: how do you tell when a byte starts a new character, versus when it’s part of a character that takes several bytes? With a fixed four bytes each, you never had to ask — a new character began every fourth byte. Now that widths vary, a byte on its own gives no clue.

The same seven bytes grouped two different ways — one giving A, Ω, 🐶, another pairing the bytes differently to give three unknown characters — showing the boundaries are ambiguous

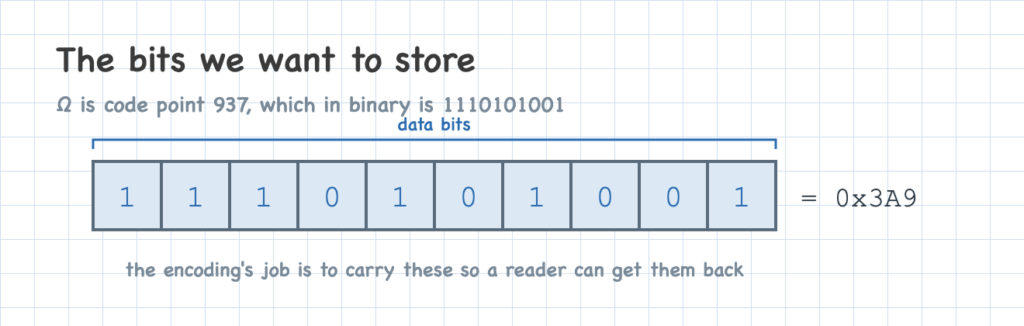
To work out a fix, let’s follow a single character: the Greek letter Ω (omega).

The data bits of Ω — code point 937 in binary

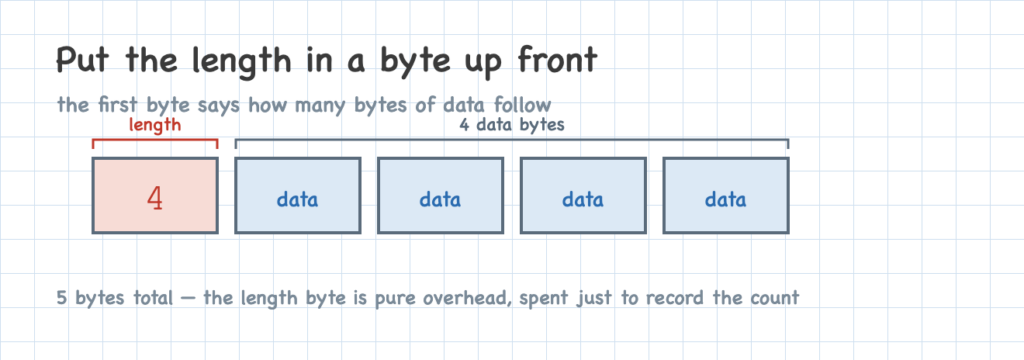
The simplest way to mark the boundaries is to put a byte in front that says how many bytes follow for a code point. It’s like a little marker that tells you what’s coming. That first byte is a count (red below); the bytes after it hold the code point’s data (blue). A value that needs four bytes of data takes a length byte plus those four data bytes — five bytes in all.

Put the length in a byte up front

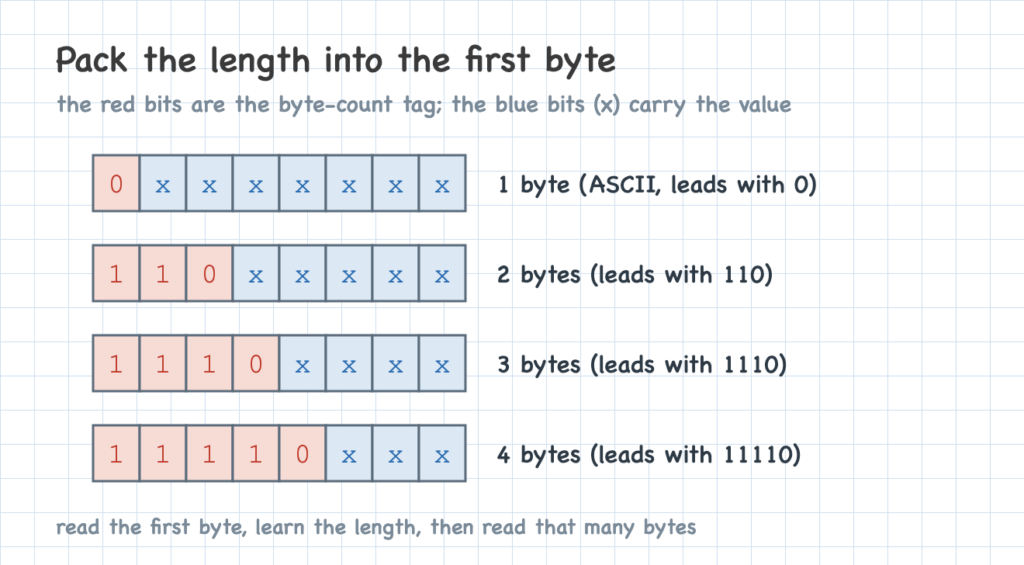
We can optimize this a little by not wasting a whole byte on the count. Instead, we put the count in the bits on the leading side of the first byte, which leaves room for data bits after it: a leading 0 means a one-byte character, 110 means two bytes, 1110 means three, and 11110 means four. The patterns are chosen cleverly to stay unambiguous — the leading bits alone tell you the length, and no count can be mistaken for another.

Pack the length into the first byte

The one-byte form has a nice property worth pausing on. Its layout — a leading 0 followed by seven data bits — is exactly how ASCII already stores a character. So every ASCII character encodes to the identical single byte in UTF-8, which means any existing ASCII file is already valid UTF-8, unchanged.

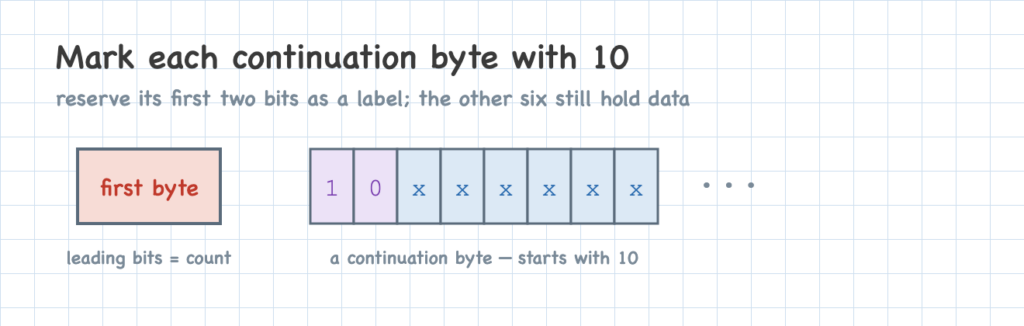
Now the bytes that follow. We mark each one the same way — a little indicator at the front — this time with 10, which says “I’m not a count, I’m continuing the character.” Any byte starting with 10 is mid-character, and any other byte begins a new one, so you can always tell where a character starts.

Mark each continuation byte with 10

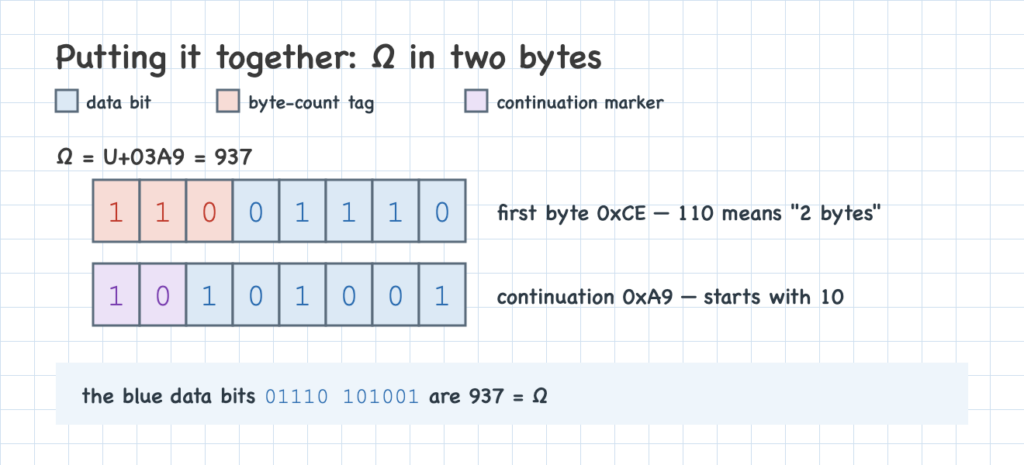
Here’s the payoff. Once the count sits in the first byte’s leading bits, the rest of that byte is free — so we let it carry data too, wasting nothing. Putting it together: the first byte’s leading bits give the length and its remaining bits hold data, and each continuation byte holds six more. Here are Ω’s ten bits packed into two bytes, sitting in the low slots with a single zero padding the top. The last color is purple: the 10 that opens the continuation byte.

Ω packed into two bytes, with data bits, the byte-count tag, and the continuation marker each in their own color

Those two rules are the whole of UTF-8: a length tag in the leading bits of the first byte, plus continuation bytes prefixed with 10.

The downsides are the price of variable width. The easy math is gone: because characters vary in size, you can’t count them by dividing, and you can’t jump to the tenth character without walking the bytes from the start to find where it begins. Decoding also takes more work than reading fixed-size slots.


From Character to Bytes

Those are real costs, but UTF-8 earns them. It has become the dominant text encoding: the default on the web, and the native encoding in most modern programming languages.

Step back and the whole path comes into view. Unicode gives a character a code point, a single agreed-on number. That number is written in binary and grouped into bytes. And an encoding — UTF-8 — turns it into the exact bytes saved to a file, held in memory, or sent over a network.

Once you know what’s underneath, you start noticing it. The U+1F600 behind an emoji is a code point. A file larger than its character count is holding multi-byte characters. And when “café” shows up as “café”, you know something messed up the encoding.

That’s the reward for going bit by bit. The letters you are reading right now became code points, then bits, then UTF-8 bytes on the way to your screen — and now you know each step of that trip.

CLI-Driven Development: Building AI-Friendly iOS and Mac Apps

I’ve been using Claude Code for several months now on many personal projects, and I’ve worked out some practices that work really well for me as an iOS and Mac developer. This CLI-driven development approach has fundamentally changed how I build applications with AI assistance.

The Problem with GUI-Based Development

One of the most powerful aspects of AI coding assistants is their ability to receive feedback and iterate on solutions. Give an AI a goal, and it can refine and improve until it gets there. However, if you’re an iOS or Mac developer, you’ve likely hit a wall: GUI interfaces are opaque to AI systems.

You could set up tooling to capture simulator screenshots, but this approach is slow and error-prone. By the time the AI gets a screenshot, analyzes it, and suggests changes, you’ve lost the rapid iteration cycle that makes AI assistants so valuable in the first place.

The other option is writing comprehensive unit tests. If you’re not doing test-driven development with AI yet, CLI-driven development is a nice stepping stone toward that goal. It has the added flexibility of interacting with real data—somewhat like an end-to-end test. Tests are still important, but this is another tool in your toolbelt for those not ready to go full TDD.

The goal is to give the AI the full context of your running application so it can fully interact with it.

Note: See the caveats section below regarding respecting user privacy and security when giving AI access to application data.


The Solution: CLI-Driven Development

CLI-driven development means architecting your application so that every use case accessible via the UI is also accessible via a command-line interface. The UI and CLI becomes access points to these use cases, rather than containing the business logic itself.

This isn’t a new idea. We’ve been told for years not to put business logic in view controllers or SwiftUI views. When working with AI, this separation becomes critical.

Benefits

  1. Better Architecture: Enforces separation between UI and business logic
  2. Faster Debugging: AI can identify and fix issues more quickly
  3. Faster Feature Development: AI has a way to give itself feedback
  4. Improved Testability: These principles make your app more unit-testable too
  5. Easier Data Migrations: AI can access and transform your real data

Architecture: Three Targets

I’m vastly oversimplifying the architectural requirements for a real application here. Folks will have their choice of patterns, frameworks, and approaches. I’m focusing on the minimal Swift package setup that will allow for this flow to work.

Think of your application as having three distinct targets within a Swift package:

  1. UI Target: Contains your SwiftUI views, view controllers, and UI interactions
  2. CLI Target: Handles command-line input/output
  3. Core Target: Contains all business logic, services, data interactions, and workflows

Both the UI and CLI targets are thin layers that simply pass data to the Core. When a user taps a button, the UI sends data to a service. When you run a CLI command, it does the same thing.

Shared Services in Core

This approach requires discipline you probably want anyway: every new feature or interaction needs a single method that can be called with all necessary parameters, with all the important logic happening outside your views. These shared services live in your Core target.

Here’s a brief example of a service to add a TODO:

Core Target – TodoService.swift:

public class TodoService {
    public func addTodo(listName: String, item: String) throws {
        // All business logic lives here
        let list = try getOrCreateList(name: listName)
        let todo = Todo(title: item, completed: false)
        list.todos.append(todo)
        try persistenceManager.save(list)
    }
}

CLI Target – main.swift:

// Parse command: ./MyAppCLI add-todo --list "Grocery" --item "Buy milk"
let service = TodoService()
try service.addTodo(listName: listName, item: item)
print("Added: \(item)")

Mac App Target – AddTodoView.swift:

struct AddTodoView: View {
    @State private var itemName = ""
    let listName: String
    let service = TodoService()

    var body: some View {
        TextField("Item", text: $itemName)
        Button("Add") {
            try? service.addTodo(listName: listName, item: itemName)
        }
    }
}

Both the CLI and Mac app call the exact same TodoService.addTodo() method. The business logic is shared, and both interfaces benefit from any improvements or fixes.


What Can You Do With This?

Debugging with AI

Let’s say you see an issue when adding a TODO to your Grocery list in the Mac app. Here’s how the conversation might go:

> I see a bug when adding a TODO to my Grocery list. Check it out.

Let me test this using the CLI:

$ ./MyAppCLI add-todo --list "Grocery" --item "Buy milk"

$ ./MyAppCLI list-todos --list "Grocery"
Grocery List:
  - Buy milk
  - Buy milk

I see the issue - the TODO is being added twice. Let me check the add-todo implementation...

[AI fixes the duplicate insertion bug]

$ ./MyAppCLI list-todos --list "Grocery"
Grocery List:
  - Buy milk

Fixed! The issue was in the data persistence layer where we were saving twice

The AI can use the CLI to reproduce the issue, see what’s happening, and iterate on fixes until it’s working correctly.

Building Features Faster

When building a feature, you can give the AI requirements and have it verify its work. Here’s an example:

> Add a feature to mark TODOs as complete. When I mark a TODO as complete,
> it should show with a checkmark when I list them. Verify it with the CLI
> and make sure it works before you're done.

I'll implement the complete-todo feature. Let me build it and test it:

[AI implements the feature in Core target]
[AI adds CLI command for marking complete]
[AI updates list display to show completion status]

Now let me test it:

$ ./MyAppCLI add-todo --list "Grocery" --item "Buy milk"
Added: Buy milk

$ ./MyAppCLI add-todo --list "Grocery" --item "Buy eggs"
Added: Buy eggs

$ ./MyAppCLI list-todos --list "Grocery"
Grocery List:
  - [ ] Buy milk
  - [ ] Buy eggs

$ ./MyAppCLI complete-todo --list "Grocery" --item "Buy milk"
Marked complete: Buy milk

$ ./MyAppCLI list-todos --list "Grocery"
Grocery List:
  - [] Buy milk
  - [ ] Buy eggs

Perfect! The feature is working. TODOs now track completion status and
display with checkmarks when completed.

The AI builds the feature and verifies it works before reporting back. In theory, you’ll see the same results in the UI application.

Data Migration and Transformation

During early iterations, you frequently need to migrate data when properties change. With a CLI, you can ask the AI to transform all your proof-of-concept data because it has access to all the APIs necessary to read and write data.

> Migrate my TODO data from the old JSON format to the new format.
> Make a backup first, then verify the results match exactly.

$ ./MyAppCLI export-data --output todos_backup.json
Exported 127 TODOs to todos_backup.json

[AI implements migration from old format to new nested format with IDs]

$ ./MyAppCLI migrate-data --from todos_backup.json --to-new-format
Migrating 127 TODOs...
Migration complete.

$ ./MyAppCLI verify-migration --old todos_backup.json --new current
 All 127 TODOs migrated successfully
 Data integrity verified

Migration complete. Backup saved at todos_backup.json.

Important Caveats

This is Not a Replacement for Unit Tests

Unit testing leads you toward similar practices of keeping services separate from UI. Following CLI-driven development actually makes your app more testable. I suggest using this approach for both unit testing and CLI-driven development. Don’t focus on CLI-driven development alone.

Security and Privacy Considerations

You must respect your customers’ privacy and security. Be mindful when giving AI access to data and understand your privacy requirements. The CLI should be treated as a development tool with the same security considerations as direct database access.

The Dangers of Mixing Locks with Core Data

Codebases accumulate patterns over time that don’t match up with current best practices. These patterns might have made sense when they were written, or they might just reflect how our understanding has evolved. Before you can address  these patterns, you need to spot them and understand why they’re risky.

One particularly dangerous combination in iOS codebases is mixing locks (@synchronized, NSLock, etc.) with Core Data’s performAndWait. These patterns were used to maintain synchronous operation patterns, but together they create hidden cross-thread dependencies that lead to deadlocks, freezing your app.

This shows exactly how these deadlocks occur, so you can recognize and avoid them in your own code.

A Simple Shared Class

Let’s start with a basic class that manages some shared state. This shows a common pattern from before Swift concurrency – using dispatch queues to manage background work. This class might be accessed from multiple threads:

  • Main thread: reads the operation status description
  • Background thread: Starts a background operation
class DataProcessor {
    var currentOperationIdentifier: String = ""
    var currentOperationStatus: String = ""

    // Called from main thread
    func getDescription() -> String {
        return "Operation \(currentOperationIdentifier) has status: \(currentOperationStatus)"
    }
    
   // Called from background thread
  func startBackgroundOperation() {
      currentOperationIdentifier = "DataSync"
      currentOperationStatus = "Processing"
      // Do processing
  }
}

The Problem – Race Conditions

When dealing with multiple threads, execution can interleave unpredictably. One thread executes some code, then another thread slips in and executes its code, then back to the first thread – you have no way of knowing the order.

Here’s what can happen:

Background ThreadMain Thread
currentOperationIdentifier = “DataSync”
(about to update status…)
getDescription()
reads identifier → “DataSync” ✓
reads status → “Idle” ❌ (old value!)
currentOperationStatus = “Processing”
❌ too late – main thread already read old value

The main thread ends up with the new identifier but the old status – a mismatch that leads to inconsistent data.

There are better solutions to this problem – like bundling related state in one immutable structure, or using actors in modern Swift. But in legacy codebases, synchronous locks were a common strategy to protect shared state.

Adding Locks for Thread Safety

The lock creates “critical sections” – ensuring we either write to both properties OR read from both without other threads interfering.

class DataProcessor {
    private let lock = NSLock()
    var currentOperationIdentifier: String = ""
    var currentOperationStatus: String = ""

    func getDescription() -> String {
        lock.lock()
        defer { lock.unlock() }
        
        return "Operation \(currentOperationIdentifier) has status: \(currentOperationStatus)"
    }

    func startBackgroundOperation() {
        lock.lock()
        defer { lock.unlock() }

        currentOperationIdentifier = "DataSync"
        currentOperationStatus = "Processing"
    }
}

So far, this works fine. The locks protect our shared state, and both threads can safely access the properties.

The Deadlock – When Locks Meet Core Data

Now let’s assume we want to store this data to Core Data. This is where things get interesting.

When sharing Core Data across threads, you can run into race conditions just like we had earlier. So you need to use the right APIs to protect the critical sections too.

Your go-to is performBlock – it asynchronously performs the work safely. However, there are cases in legacy code where the caller needs to do something synchronously using performAndWait. When you call performAndWait on a main queue context, it blocks the calling thread until the block executes on the main thread. Think of waiting on the main queue as our “lock”.

Let’s assume some developer in the past (who definitely isn’t you) decided to use performAndWait here:

func startBackgroundOperation(with context: NSManagedObjectContext) {
    lock.lock()
    defer { lock.unlock() }
    
    // Assume the main thread tries to call
    // getDescription() at this point. 
    // It is blocked as we are holding the lock

    currentOperationIdentifier = "DataSync"
    currentOperationStatus = "Processing"

    // 💀 DEADLOCK HAPPENS HERE
    context.performAndWait {
        saveDataToStore(context: context)
    }
}

Why Does This Deadlock?

There’s a problem:

  • performAndWait needs the MAIN THREAD to execute this block
  • The MAIN THREAD is blocked waiting for our lock (in getDescription)
  • We’re holding that lock and won’t release until performAndWait completes

CIRCULAR WAIT = DEADLOCK

Timeline of the Deadlock

Background ThreadMain Thread
lock.lock() ✅
Updates propertiesCalls getDescription()
Still holding lock…             lock.lock() ❌ WAITING…
Waiting on performAndWait() (needs main thread)Can’t process – stuck waiting on lock!
  • Main thread: stuck in lock.lock() waiting for background thread
  • Background thread: stuck in performAndWait waiting for main thread

 How to Fix This Deadlock

The best solution is to eliminate performAndWait entirely and use the asynchronous perform instead. This breaks the circular dependency because the background thread no longer waits for the main thread:

func startBackgroundOperation(with context: NSManagedObjectContext) {
    lock.lock()
    defer { lock.unlock() }

    currentOperationIdentifier = "DataSync"
    currentOperationStatus = "Processing"

    // ✅ No deadlock
    // doesn't block waiting for main thread
    context.perform {
        self.saveDataToStore(context: context)
    }
}

If you absolutely cannot eliminate performAndWait, you’ll need to carefully analyze all lock dependencies, but this is error-prone and hard to maintain. The real fix is embracing asynchronous patterns.

What We Learned

In this article, we’ve seen how mixing locks with Core Data’s performAndWait creates a classic deadlock scenario:

  1. Race conditions can occur when multiple threads access shared mutable state
  2. Locks were traditionally used to protect this shared state with critical sections
  3. performAndWait works like a lock but requiring the main thread to execute
  4. When a background thread holds a lock and calls performAndWait, while the main thread is waiting for that same lock, we get a circular dependency – neither thread can proceed

Coming Up


Future articles will explore other ways you can hit or avoid these deadlocks:

  • Child contexts with read operations – Why using a child context doesn’t save you from deadlocks during fetch operations
  • Child contexts with write operations – How save operations on child contexts create the same circular dependencies
  • Private Contexts – Why private contexts with direct store connections are less likely to lock up